> ## Documentation Index
> Fetch the complete documentation index at: https://docs.abbyy.com/llms.txt
> Use this file to discover all available pages before exploring further.
# Sample 2. Step 11: Create a RecipeNumber element
> Describe the RecipeNumber Character String element: define its alphabet, character count range, and Relations that anchor it to the Recipe field name.
The **Recipe #** field always contains a single line. Its value varies, unlike the field name, so define it as a [Character String](/flexi-capture/fls/template/character-chain) element.
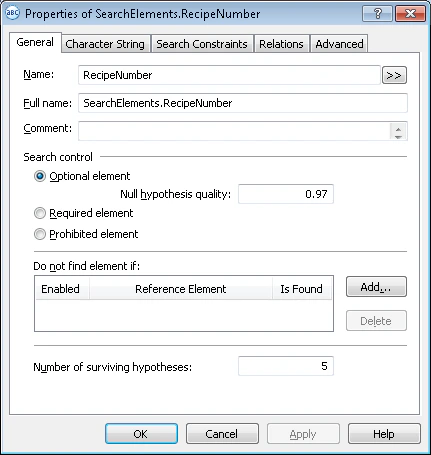
Create an element of type **Character String** and name it **RecipeNumber**.
 Click the **Character String** tab.
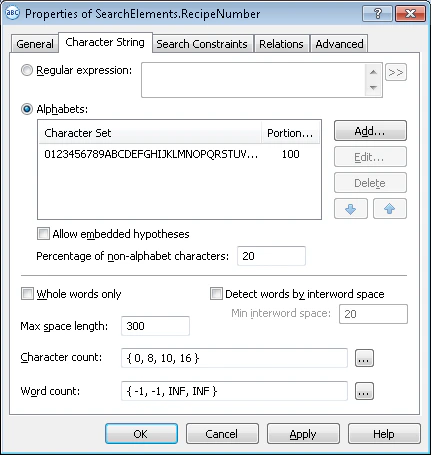 The alphabet is all the characters that may appear in recipe numbers. In the test images, these are digits and capital English letters, in no fixed order.
To set it, click **Add...** and select the required characters in the **Add New Alphabet** dialog box.
The alphabet is all the characters that may appear in recipe numbers. In the test images, these are digits and capital English letters, in no fixed order.
To set it, click **Add...** and select the required characters in the **Add New Alphabet** dialog box.
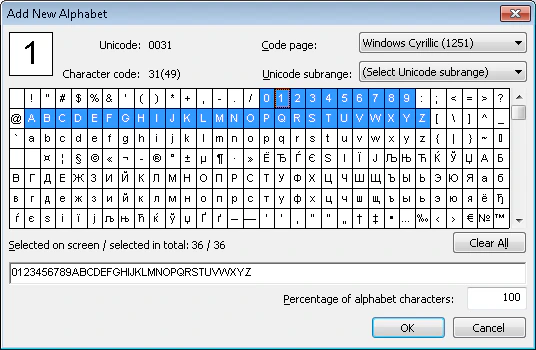 The selected characters appear in the **Character Set** column (on the **Character String** tab, in the **Alphabets** field).
In the **Percentage of alphabet characters** field, enter 1. FlexiLayout Studio then considers only this element's characters when searching for the **RecipeNumber** object.
You can specify several alphabets for one element. In the **Percentage of alphabet characters** field, specify the maximum percentage of characters from each alphabet.
Clear the **Allow embedded hypotheses** check box. This lets FlexiLayout Studio formulate hypotheses of the maximum length that meet all search criteria.
Otherwise, it may formulate several embedded hypotheses from portions of the selected alphabets, within the allowed percentage of non-alphabet characters.
In the **Percentage of non-alphabet characters** field, set the maximum to 20%.
Set this value by trial and error. You can change it later when adjusting the FlexiLayout.
In the **Character count** field, specify this fuzzy range: `{0, 8, 10, 16}`. Recipe numbers are 8 digits long, but the range allows 8 to 10 as a safety margin. Any hypotheses outside it are penalized.
Set this value by trial and error. You can change it later when adjusting the FlexiLayout.
Click the **Relations** tab.
The selected characters appear in the **Character Set** column (on the **Character String** tab, in the **Alphabets** field).
In the **Percentage of alphabet characters** field, enter 1. FlexiLayout Studio then considers only this element's characters when searching for the **RecipeNumber** object.
You can specify several alphabets for one element. In the **Percentage of alphabet characters** field, specify the maximum percentage of characters from each alphabet.
Clear the **Allow embedded hypotheses** check box. This lets FlexiLayout Studio formulate hypotheses of the maximum length that meet all search criteria.
Otherwise, it may formulate several embedded hypotheses from portions of the selected alphabets, within the allowed percentage of non-alphabet characters.
In the **Percentage of non-alphabet characters** field, set the maximum to 20%.
Set this value by trial and error. You can change it later when adjusting the FlexiLayout.
In the **Character count** field, specify this fuzzy range: `{0, 8, 10, 16}`. Recipe numbers are 8 digits long, but the range allows 8 to 10 as a safety margin. Any hypotheses outside it are penalized.
Set this value by trial and error. You can change it later when adjusting the FlexiLayout.
Click the **Relations** tab.
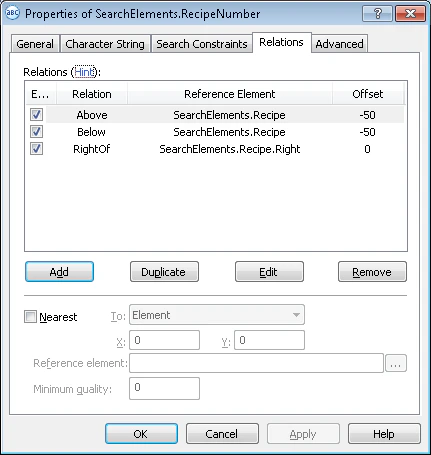 Use the **Recipe** element as the reference element for the **RecipeNumber** element. The recipe number always appears to the right of the field name, on the same level. Specify the element's location relative to the field name and its top and bottom boundaries.
Otherwise, FlexiLayout Studio treats any text fragment in the alphabet as a valid hypothesis, even one above or below the field name.
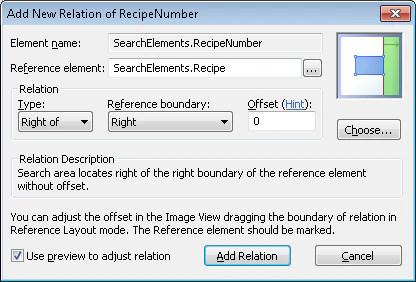
Specify that the **RecipeNumber** element is to the right of the right boundary of the **Recipe** element.
1. Click **Add**.
2. In the dialog box that opens, select **Recipe** in the **Reference element** field.
3. From the **Type** drop-down list, select **Right of**. In the **Reference boundary** drop-down list, select **Right**, and leave the default **Offset** value of 0.
4. Click **Add Relation**.
Use the **Recipe** element as the reference element for the **RecipeNumber** element. The recipe number always appears to the right of the field name, on the same level. Specify the element's location relative to the field name and its top and bottom boundaries.
Otherwise, FlexiLayout Studio treats any text fragment in the alphabet as a valid hypothesis, even one above or below the field name.
Specify that the **RecipeNumber** element is to the right of the right boundary of the **Recipe** element.
1. Click **Add**.
2. In the dialog box that opens, select **Recipe** in the **Reference element** field.
3. From the **Type** drop-down list, select **Right of**. In the **Reference boundary** drop-down list, select **Right**, and leave the default **Offset** value of 0.
4. Click **Add Relation**.
 Specify that the **RecipeNumber** element is not lower than the **Recipe** element.
1. Click **Add**.
2. In the dialog box that opens, select **Recipe** in the **Reference element** field.
3. In the **Type** drop-down list, select **Above** and set **Offset** to -50 (found by trial and error).
4. Click **Add Relation**.
This gives FlexiLayout Studio some flexibility when locating the element relative to the field name. The negative **Offset** value means the bottom element boundary is below the bottom boundary of the name.
Specify that the **RecipeNumber** element is not higher than the **Recipe** element.
1. Click **Add**.
2. In the dialog box that opens, select **Recipe** in the **Reference element** field.
3. In the **Type** drop-down list, select **Below** and set **Offset** to -50 (found by trial and error).
4. Click **Add Relation**.
This gives FlexiLayout Studio some flexibility when locating the element relative to the field name. The negative **Offset** value means the top element boundary is above the top boundary of the name.
Match the FlexiLayout against the test images and confirm that FlexiLayout Studio finds the recipe number on every image.
## How the Reference boundary field works
The **Reference boundary** field determines how positive **Offset** values constrain the search area:
* If you select **\**, positive **Offset** values allow only these locations:
* To the right of the right boundary of the element
* To the left of the left boundary
* Higher than the top boundary
* Lower than the bottom boundary
* If you select **Top** and **Bottom**, positive **Offset** values limit the search area by the top and bottom boundaries of the element and exclude hypotheses that go beyond the left and right boundaries of the field name.
Specify that the **RecipeNumber** element is not lower than the **Recipe** element.
1. Click **Add**.
2. In the dialog box that opens, select **Recipe** in the **Reference element** field.
3. In the **Type** drop-down list, select **Above** and set **Offset** to -50 (found by trial and error).
4. Click **Add Relation**.
This gives FlexiLayout Studio some flexibility when locating the element relative to the field name. The negative **Offset** value means the bottom element boundary is below the bottom boundary of the name.
Specify that the **RecipeNumber** element is not higher than the **Recipe** element.
1. Click **Add**.
2. In the dialog box that opens, select **Recipe** in the **Reference element** field.
3. In the **Type** drop-down list, select **Below** and set **Offset** to -50 (found by trial and error).
4. Click **Add Relation**.
This gives FlexiLayout Studio some flexibility when locating the element relative to the field name. The negative **Offset** value means the top element boundary is above the top boundary of the name.
Match the FlexiLayout against the test images and confirm that FlexiLayout Studio finds the recipe number on every image.
## How the Reference boundary field works
The **Reference boundary** field determines how positive **Offset** values constrain the search area:
* If you select **\**, positive **Offset** values allow only these locations:
* To the right of the right boundary of the element
* To the left of the left boundary
* Higher than the top boundary
* Lower than the bottom boundary
* If you select **Top** and **Bottom**, positive **Offset** values limit the search area by the top and bottom boundaries of the element and exclude hypotheses that go beyond the left and right boundaries of the field name.