> ## Documentation Index
> Fetch the complete documentation index at: https://docs.abbyy.com/llms.txt
> Use this file to discover all available pages before exploring further.
# 分散ファイル システムを設定する
> ABBYY FlexiCapture Processing Server のファイル ストレージを、DFS Namespaces と DFS Replication を使用してフェールセーフ化する方法について、役割、共有フォルダー、名前空間を含めて説明します。
クラスターにインストールされている場合、Processing Server は一時ファイルの保存にファイル ストレージを使用します。ファイル ストレージで障害が発生すると、クラスター全体が停止します。クラスターを継続的に運用するには、ファイル ストレージをフェールセーフ化する必要があります。
文書画像と抽出データを保存する[ファイル ストレージ](/ja/flexi-capture/admin-guide/architecture-ag)には、ハードウェア ソリューション (たとえば、RAID ディスク) を使用する必要があります。ソフトウェア ベースの分散ストレージ ソリューションはサポートされていません。
このトピックでは、DFS Namespaces と DFS Replication を使用してフェールセーフなファイル ストレージを実装する方法の一例を説明します。DFS Namespaces は、異なるサーバー上にある複数のフォルダーの仮想ディレクトリを作成する機能で、いずれかのサーバーで障害が発生しても引き続きアクセスできます。DFS Replication は、`ServerSettings.xml` ファイルの変更を自動的に追跡し、バックアップ フォルダーに複製します。
以下の手順では、`DCsrv` という名前のコンピューターをホスト サーバーとして使用しますが、DFS の役割が設定されている任意のコンピューターを使用できます。
開始する前に、次のものが必要です。
* クラスター ノードまたはファイル ストレージとして使用されていない、Windows Server 2012 以降を実行するコンピューター
* そのコンピューターに設定された DFS Namespaces と DFS Replication の役割
* すべてのノードに設定された DFS Namespaces と DFS Replication の役割
* `node1admin` ユーザーおよび `node2admin` ユーザーにフル コントロールのアクセス許可が付与された共有フォルダー。この共有フォルダーは、メインの共有フォルダーにアクセスできなくなった場合にバックアップとして機能します
分散ファイル システムを設定するには、次の手順を実行します。
1. [DFS の役割を追加する](#dfs-roles)。
2. [共有フォルダーを作成する](#dfs-file-share)。
3. [名前空間を作成する](#dfs-namespace)。
4. [共有フォルダーを名前空間に追加する](#dfs-adding-file-shares-to-namaspace)。
5. [レプリケーションを設定する](#dfs-replication)。
6. [フォルダー ターゲットの優先順位を設定する](#dfs-priority)。
7. [ABBYY FlexiCapture Processing Server サービスを構成する](#dfs-setting-fcprocessingserver)。
## DFS の役割を追加
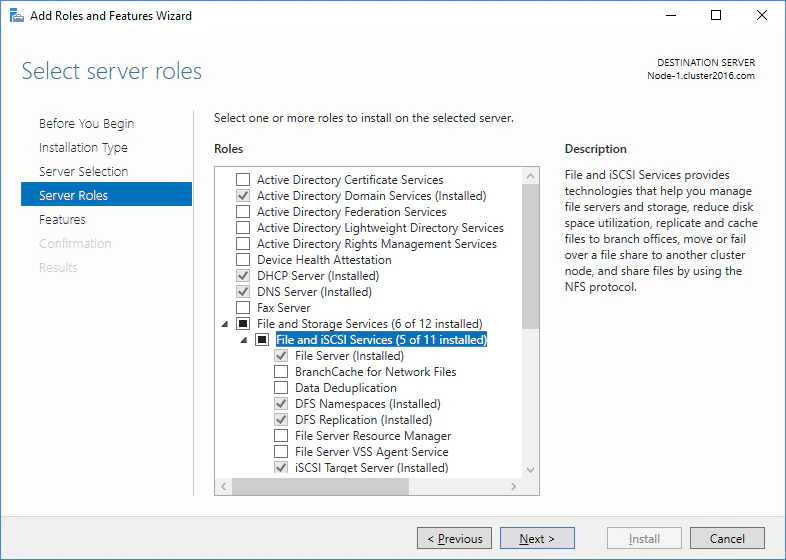
1. **Server Manager** を開き、**Add Roles and Features** をクリックします。
2. **Select server roles** ステージで、**File and Storage Services** を展開し、**DFS Namespaces** と **DFS Replication** の項目を選択します。
 ## 共有フォルダーの作成
共有フォルダーは、次の条件を満たす必要があります。
* クラスターからレプリケートされたデータの保存にのみ使用してください。
* このフォルダーは、クラスター ノード上にもファイル ストレージ内にも配置しないでください。
* このフォルダーには、すべてのノードからアクセスできる必要があります。
共有フォルダーを作成するには、**Server Manager** を開き、**File and Storage Services → Shares** をクリックしてから、**Tasks → New Share...** をクリックします。次に、[Processing Server サービス用の共有フォルダーの作成](/ja/flexi-capture/admin-guide/fail-safety-proc#network-folder)で説明されている手順 2 ~ 14 を実行します。
## 名前空間を作成
名前空間は **DFS Management** コンソールで作成および設定します。ここで、サーバーを選択し、ユーザーにアクセス権限を付与して、名前空間の型を指定します。
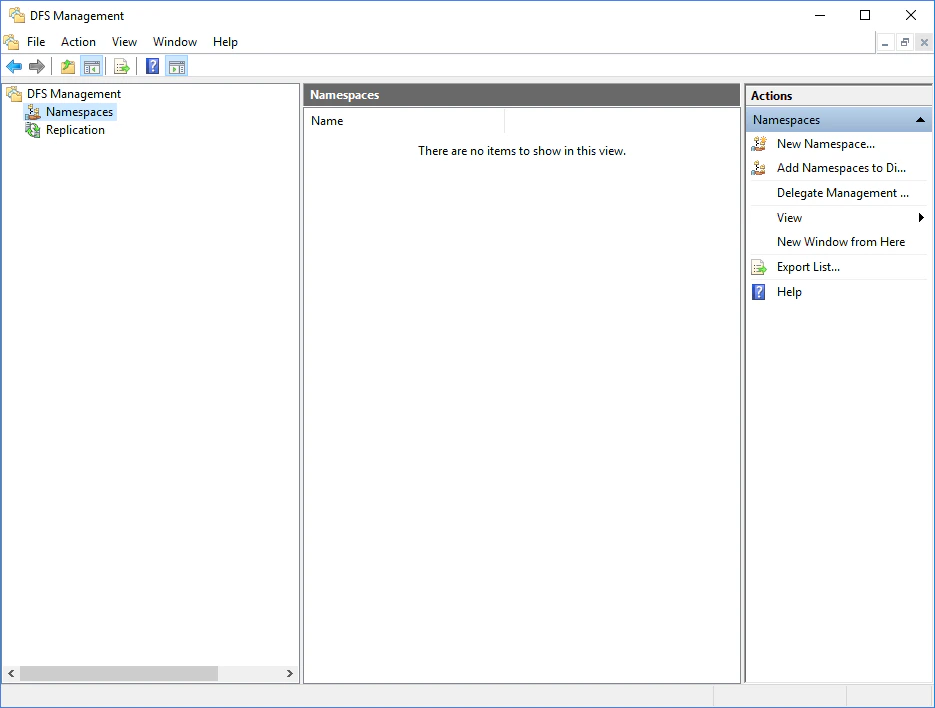
1. **Server Manager** を開き、**Tools → DFS Management** をクリックします。開いた DFS Management スナップインで、**New Namespace...** をクリックします。
## 共有フォルダーの作成
共有フォルダーは、次の条件を満たす必要があります。
* クラスターからレプリケートされたデータの保存にのみ使用してください。
* このフォルダーは、クラスター ノード上にもファイル ストレージ内にも配置しないでください。
* このフォルダーには、すべてのノードからアクセスできる必要があります。
共有フォルダーを作成するには、**Server Manager** を開き、**File and Storage Services → Shares** をクリックしてから、**Tasks → New Share...** をクリックします。次に、[Processing Server サービス用の共有フォルダーの作成](/ja/flexi-capture/admin-guide/fail-safety-proc#network-folder)で説明されている手順 2 ~ 14 を実行します。
## 名前空間を作成
名前空間は **DFS Management** コンソールで作成および設定します。ここで、サーバーを選択し、ユーザーにアクセス権限を付与して、名前空間の型を指定します。
1. **Server Manager** を開き、**Tools → DFS Management** をクリックします。開いた DFS Management スナップインで、**New Namespace...** をクリックします。
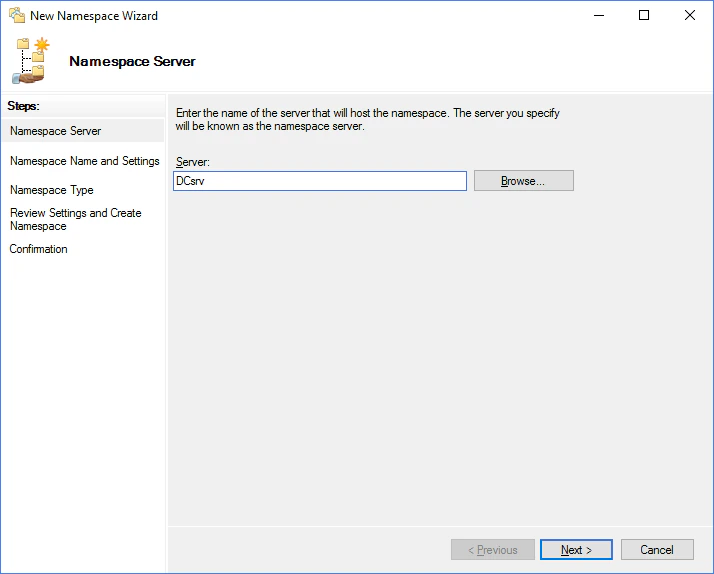
 2. 名前空間をホストするサーバー名を指定し、**Next** をクリックします。
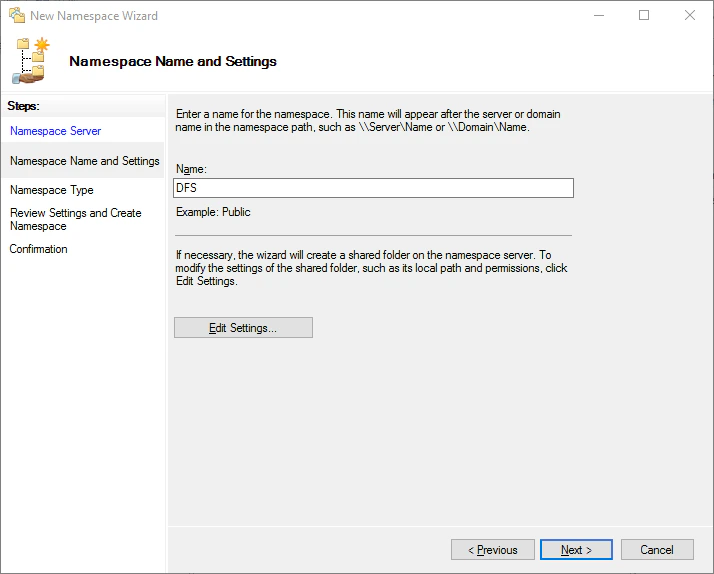
 3. 名前空間の名前を指定し、**Edit Settings...** をクリックします。
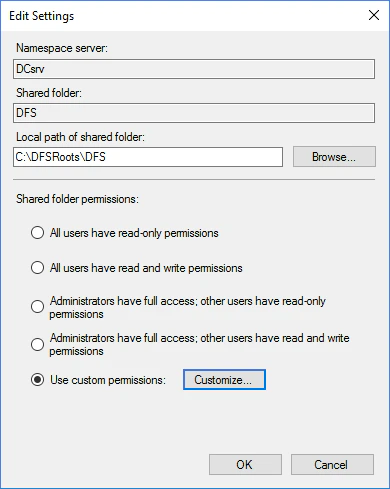
 4. **Edit Settings** ダイアログで、**Use custom permissions** オプションを選択し、**Customize...** をクリックします。次に、共有フォルダーに対するフル コントロールのアクセス許可を `node1admin` ユーザーと `node2admin` ユーザーに付与します。
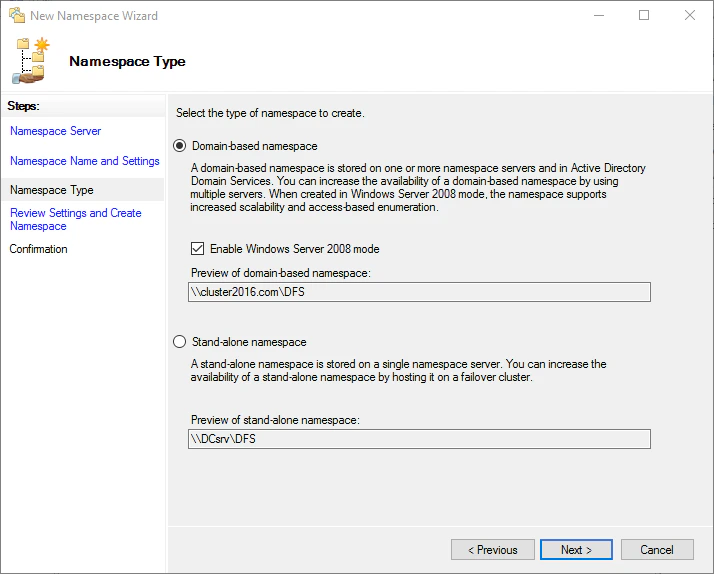
 5. **Namespace Type** ステップで **Domain-based namespace** を選択し、続いて **Enable Windows Server 2008 mode** オプションを選択して **Next** をクリックします。
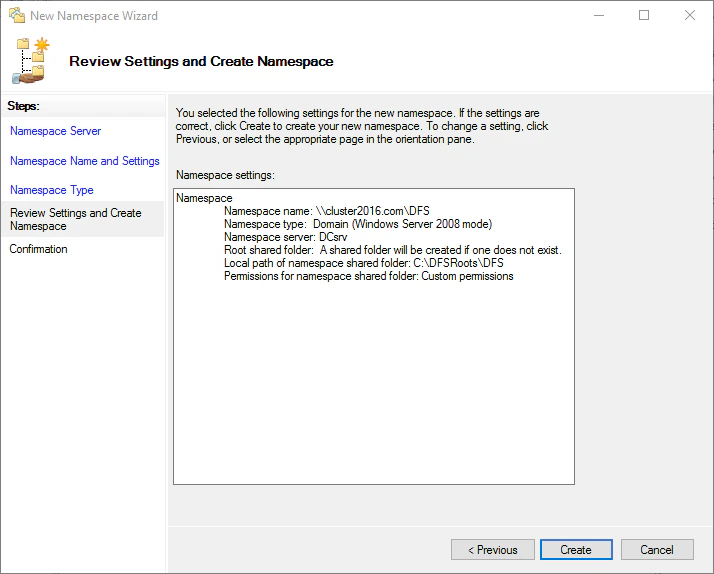
 6. 指定した設定が正しいことを確認し、**Create** をクリックします。
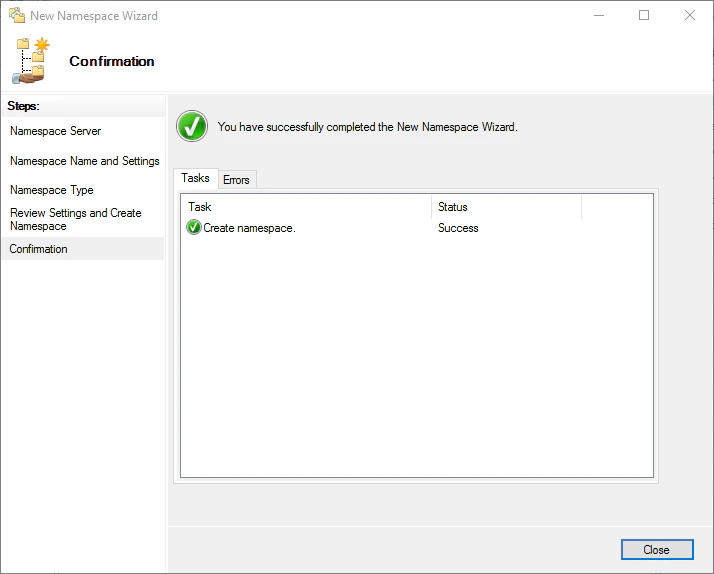
 7. **Close** をクリックしてウィザードを閉じます。
 ## 共有フォルダーを名前空間に追加する
メインの共有フォルダーとバックアップ用の共有フォルダーを名前空間に追加します。
1. DFS Management スナップインで、**新しいフォルダー...** をクリックします。
## 共有フォルダーを名前空間に追加する
メインの共有フォルダーとバックアップ用の共有フォルダーを名前空間に追加します。
1. DFS Management スナップインで、**新しいフォルダー...** をクリックします。
![cluster2016.com の DFS 名前空間が表示され、操作ペインで [新しいフォルダー] コマンドが強調表示されている DFS Management コンソールのスクリーンショット。](https://mintcdn.com/abbyy/IFr-A2MDVJd80FDs/images/flexi-capture/DFS47.png?fit=max&auto=format&n=IFr-A2MDVJd80FDs&q=85&s=5b07fb1da2328d23a4c9c9a45e2c7ad8) 2. 開いたダイアログでフォルダー名を指定し、**追加...** をクリックします。指定した名前は分散ファイル システムの名前空間に表示されます。
共有フォルダーに指定する名前は、レプリケートされるフォルダーの名前と同じにしないでください。
2. 開いたダイアログでフォルダー名を指定し、**追加...** をクリックします。指定した名前は分散ファイル システムの名前空間に表示されます。
共有フォルダーに指定する名前は、レプリケートされるフォルダーの名前と同じにしないでください。
![フォルダー名として FC12ClusterTemp が入力され、空の [Folder targets] リストと使用可能な [追加] ボタンが表示されている [新しいフォルダー] ダイアログのスクリーンショット。](https://mintcdn.com/abbyy/IFr-A2MDVJd80FDs/images/flexi-capture/DFS20.png?fit=max&auto=format&n=IFr-A2MDVJd80FDs&q=85&s=a7942043a2c143a5386b59cc8d50c744) 3. 共有フォルダーへのパスを指定し、**OK** をクリックします。
3. 共有フォルダーへのパスを指定し、**OK** をクリックします。
![[Path to folder target] field に共有フォルダー ターゲットへのパスが入力されている [Folder Target の追加] ダイアログのスクリーンショット。](https://mintcdn.com/abbyy/IFr-A2MDVJd80FDs/images/flexi-capture/DFS13.png?fit=max&auto=format&n=IFr-A2MDVJd80FDs&q=85&s=69e103485f71e81b4c8195b00352e221) 4. 再度 **追加...** をクリックし、バックアップ フォルダーへのパスを指定します。両方のフォルダー ターゲットが **Folder targets** リストに表示されます。設定が終わったら、**OK** をクリックします。
4. 再度 **追加...** をクリックし、バックアップ フォルダーへのパスを指定します。両方のフォルダー ターゲットが **Folder targets** リストに表示されます。設定が終わったら、**OK** をクリックします。
![メイン共有フォルダーとバックアップ共有フォルダーのパスが [Folder targets] リストに表示されている [新しいフォルダー] ダイアログのスクリーンショット。](https://mintcdn.com/abbyy/IFr-A2MDVJd80FDs/images/flexi-capture/DFS24.png?fit=max&auto=format&n=IFr-A2MDVJd80FDs&q=85&s=e07edf3aa7d90c11b70940ec0095b982) 5. レプリケーション グループを作成するかどうかを確認するメッセージが表示されます。レプリケーション グループを作成してレプリケーションの設定を開始するには、**はい** をクリックします。
5. レプリケーション グループを作成するかどうかを確認するメッセージが表示されます。レプリケーション グループを作成してレプリケーションの設定を開始するには、**はい** をクリックします。
![フォルダー ターゲットを同期するためのレプリケーション グループを作成するかどうかを確認するレプリケーション メッセージ ボックスと、[はい] ボタンおよび [いいえ] ボタンが表示されているスクリーンショット。](https://mintcdn.com/abbyy/IFr-A2MDVJd80FDs/images/flexi-capture/DFS25.png?fit=max&auto=format&n=IFr-A2MDVJd80FDs&q=85&s=b8693d61ca37b5e3783daf2d8fcd88d4) ## レプリケーションの設定
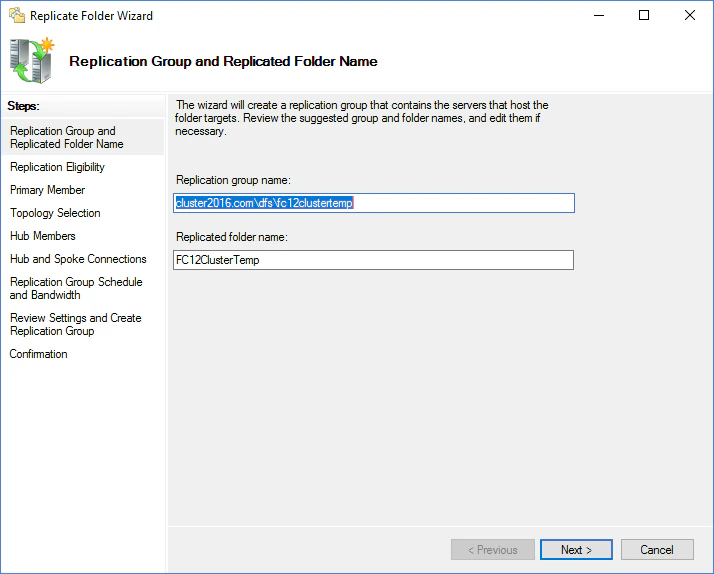
レプリケーションの設定では、レプリケーション グループを作成し、サーバーを指定し、グループメンバー間の接続トポロジを選択し、レプリケーションスケジュールを選択し、レプリケーション帯域幅を指定します。これらはすべて **Replicate Folder Wizard** で設定します。
1. ウィザードにより、レプリケーション グループとレプリケートするフォルダーの名前が提案されます。必要に応じてこれらの名前を編集するか、デフォルト名のまま **Next** をクリックします。
## レプリケーションの設定
レプリケーションの設定では、レプリケーション グループを作成し、サーバーを指定し、グループメンバー間の接続トポロジを選択し、レプリケーションスケジュールを選択し、レプリケーション帯域幅を指定します。これらはすべて **Replicate Folder Wizard** で設定します。
1. ウィザードにより、レプリケーション グループとレプリケートするフォルダーの名前が提案されます。必要に応じてこれらの名前を編集するか、デフォルト名のまま **Next** をクリックします。
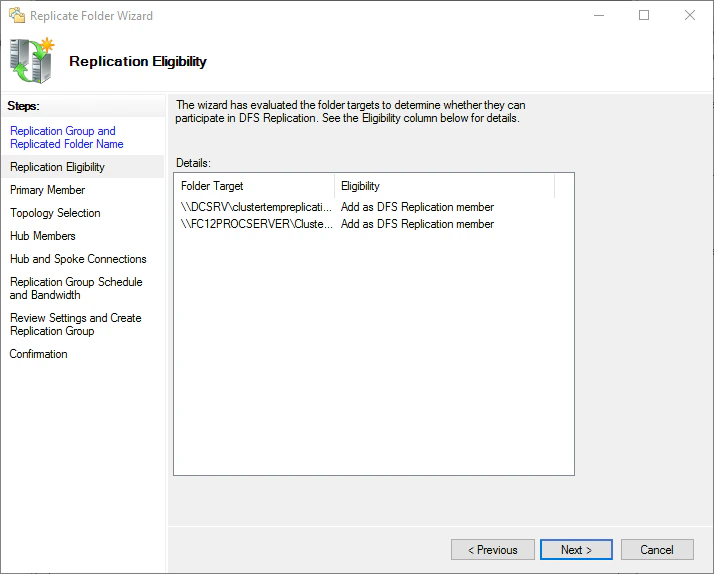
 2. フォルダー ターゲットがレプリケーションに参加できるかどうかがウィザードに表示されます。**Eligibility** 列の情報を確認し、**Next** をクリックします。
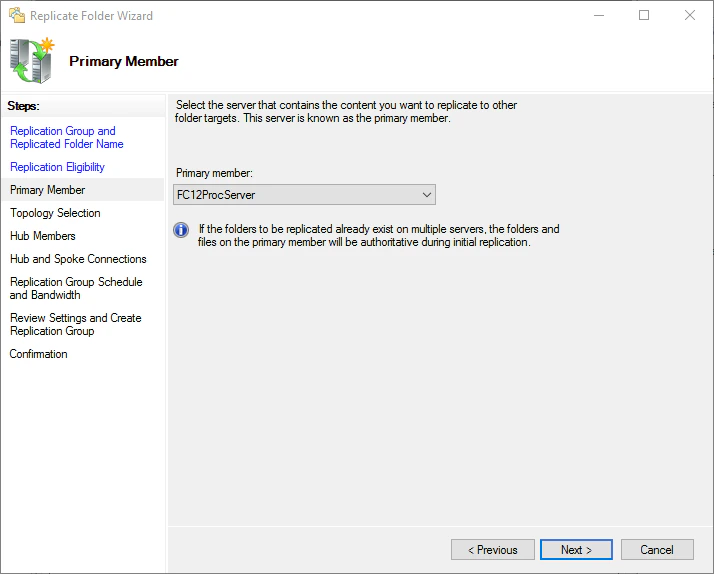
 3. フォルダー ターゲットにレプリケートするデータが含まれているサーバーを選択し、**Next** をクリックします。
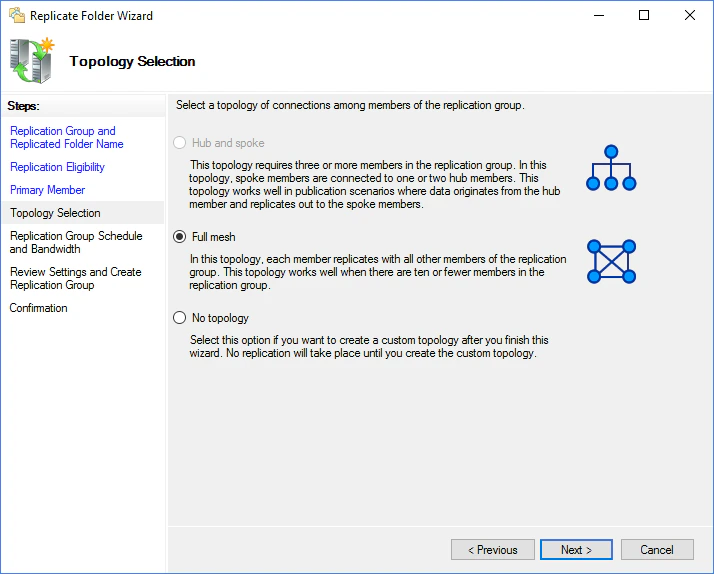
 4. 使用するトポロジとして **Full mesh** を選択し、**Next** をクリックします。
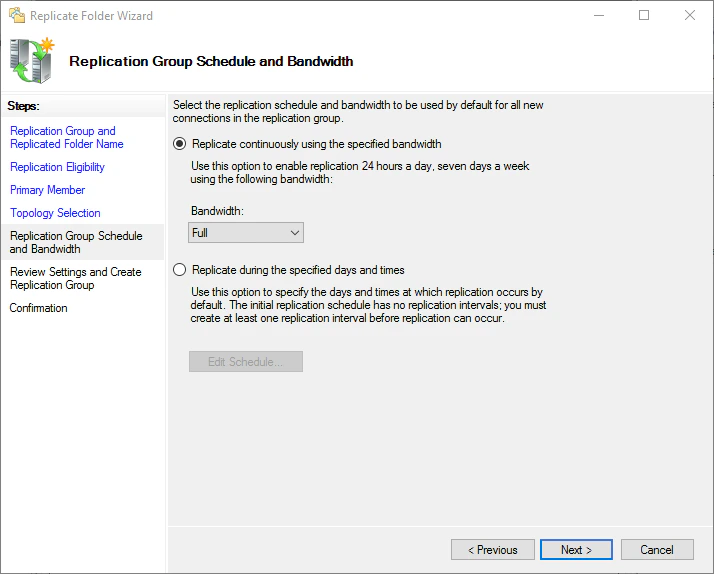
 5. レプリケーションスケジュールでは、**Replicate continuously using the specified bandwidth** を選択します。**Bandwidth** ドロップダウンリストから **Full** を選択し、**Next** をクリックします。
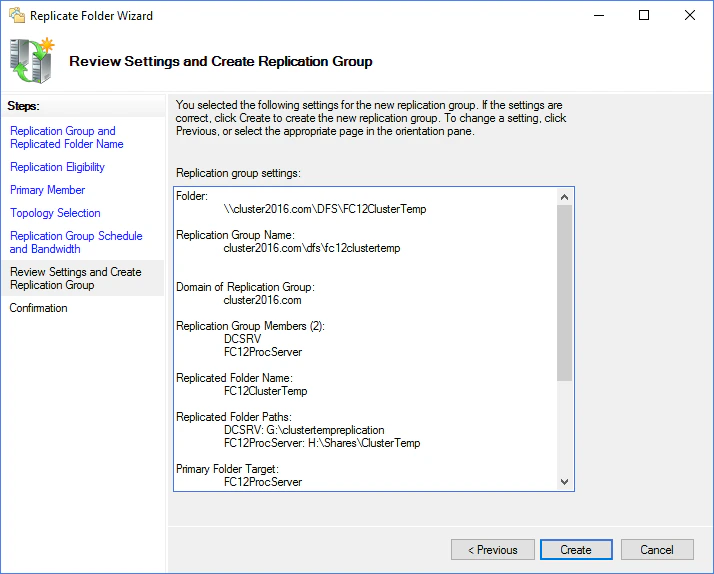
 6. 指定した設定が正しいことを確認し、**Create** をクリックします。
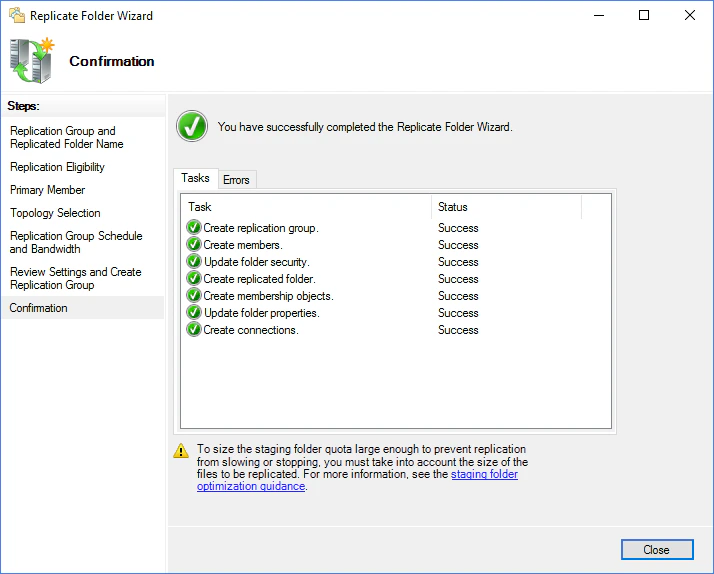
 7. レプリケーション グループが作成されたら、ウィザードを閉じるため **Close** をクリックします。
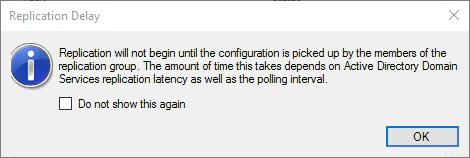
 8. **Replication Delay** の警告が表示された場合は、**OK** をクリックします。
 レプリケーションを設定したら、正しく動作することを確認するためにテストすることをお勧めします。これを行うには、**DFS Management** スナップインを開き、新しく作成したレプリケーション グループを選択して **Create Diagnostic Report** をクリックします。
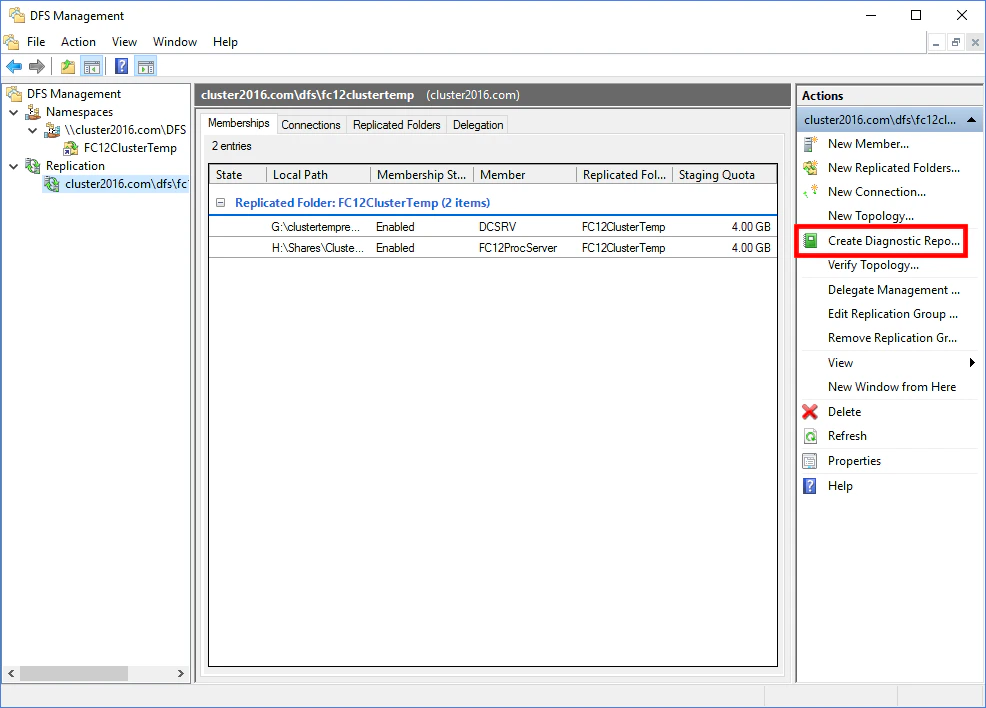 開いた **Diagnostic Report Wizard** で **Propagation test** オプションを選択し、ウィザードの指示に従います (デフォルト設定のままにしておくことをお勧めします) 。
診断が完了すると、**Diagnostic Report Wizard** に診断レポートが表示されます。
## フォルダー ターゲットの優先順位を設定する
誤動作のリスクを最小限に抑えるため、フォルダー ターゲットの優先順位を設定することをお勧めします。
これは、フォルダー ターゲットの優先順位設定の一例です。ニーズに応じて、別の設定も可能です。ターゲットの優先順位を設定する詳しい手順については、[Microsoft Web サイトのこちらのページ](https://docs.microsoft.com/en-us/windows-server/storage/dfs-namespaces/set-target-priority-to-override-referral-ordering)を参照してください。
1. 名前空間を開き、共有フォルダーのプロパティを開きます。
開いた **Diagnostic Report Wizard** で **Propagation test** オプションを選択し、ウィザードの指示に従います (デフォルト設定のままにしておくことをお勧めします) 。
診断が完了すると、**Diagnostic Report Wizard** に診断レポートが表示されます。
## フォルダー ターゲットの優先順位を設定する
誤動作のリスクを最小限に抑えるため、フォルダー ターゲットの優先順位を設定することをお勧めします。
これは、フォルダー ターゲットの優先順位設定の一例です。ニーズに応じて、別の設定も可能です。ターゲットの優先順位を設定する詳しい手順については、[Microsoft Web サイトのこちらのページ](https://docs.microsoft.com/en-us/windows-server/storage/dfs-namespaces/set-target-priority-to-override-referral-ordering)を参照してください。
1. 名前空間を開き、共有フォルダーのプロパティを開きます。
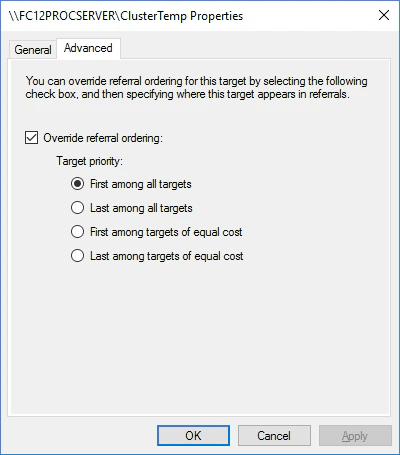
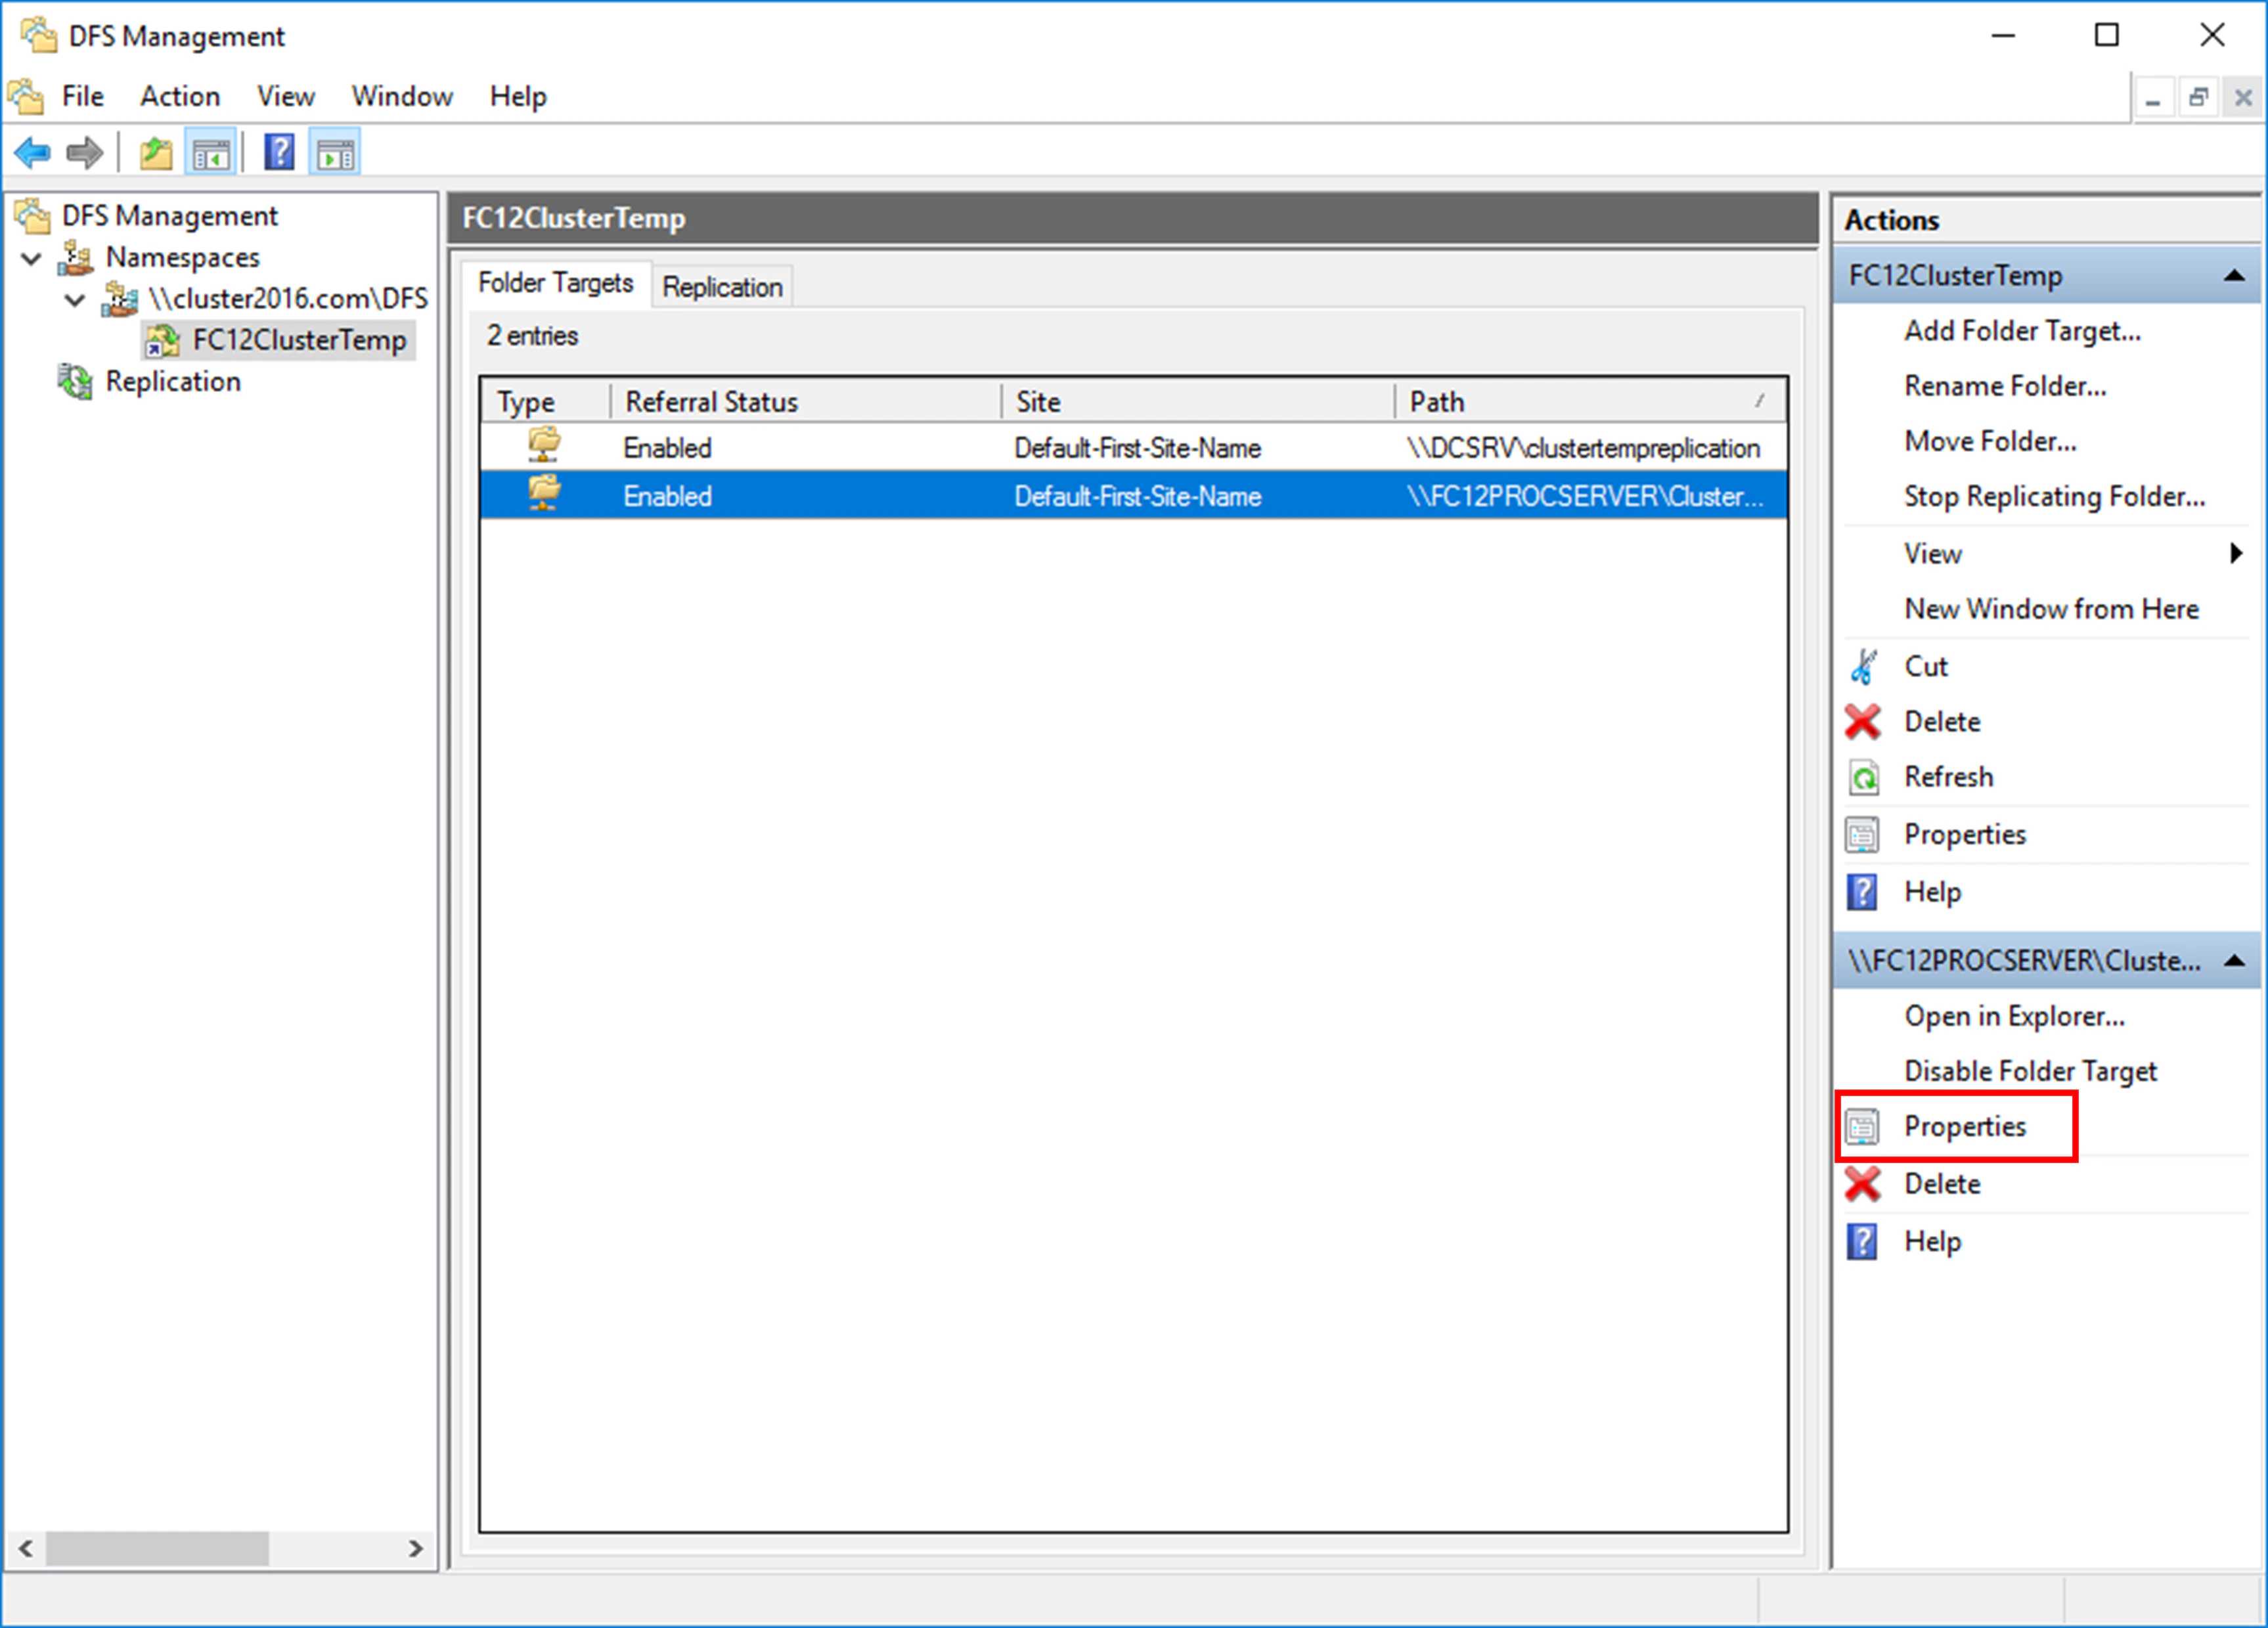 2. **Advanced** をクリックし、**Override referral ordering** オプションを選択してから、**First among all targets** を選択します。このオプションは、アクセス可能な場合、ユーザーが常に選択したフォルダー ターゲットに誘導されることを意味します。
 ## ABBYY FlexiCapture Processing Server サービスの構成
ファイル ストレージに障害が発生した場合でも、ABBYY FlexiCapture Processing Server サービスをホストするクラスターを継続的に稼働させるには、次の手順を実行します。
ファイル ストレージに障害が発生すると、障害発生時に開いていたセッションに関するデータが失われる可能性があります。
1. [ABBYY FlexiCapture Processing Server サービスの設定](/ja/flexi-capture/admin-guide/fail-safety-proc#procserv-local-setup)に記載されている手順 1 ~ 4 を実行します。ただし、手順 1 では、Processing Server の設定が含まれているファイルへのパスを変更してください。手順 1 のコマンドは次のとおりです。
```
sc config ABBYY.ProcServer.FlexiCapture.12.0 binpath= "%systemdrive%\Program Files\ABBYY FlexiCapture 12 Servers\FlexiBRSvc.exe \service -stationType:server -inifile:\\cluster2016.com\DFS\FC12ClusterTemp\serversettings.xml"
```
上記のコマンドをコピーして貼り付けると、不要な改行文字が含まれ、エラーが発生する場合があります。その場合は、コマンドを手入力してください。
2. Windows レジストリで `%appdata%` 変数を `\\cluster2016.com\DFS\FC12ClusterTemp` に直接変更します ([%appdata% 変数の変更](/ja/flexi-capture/admin-guide/fail-safety-proc#appdata-changing) を参照)。
## ABBYY FlexiCapture Processing Server サービスの構成
ファイル ストレージに障害が発生した場合でも、ABBYY FlexiCapture Processing Server サービスをホストするクラスターを継続的に稼働させるには、次の手順を実行します。
ファイル ストレージに障害が発生すると、障害発生時に開いていたセッションに関するデータが失われる可能性があります。
1. [ABBYY FlexiCapture Processing Server サービスの設定](/ja/flexi-capture/admin-guide/fail-safety-proc#procserv-local-setup)に記載されている手順 1 ~ 4 を実行します。ただし、手順 1 では、Processing Server の設定が含まれているファイルへのパスを変更してください。手順 1 のコマンドは次のとおりです。
```
sc config ABBYY.ProcServer.FlexiCapture.12.0 binpath= "%systemdrive%\Program Files\ABBYY FlexiCapture 12 Servers\FlexiBRSvc.exe \service -stationType:server -inifile:\\cluster2016.com\DFS\FC12ClusterTemp\serversettings.xml"
```
上記のコマンドをコピーして貼り付けると、不要な改行文字が含まれ、エラーが発生する場合があります。その場合は、コマンドを手入力してください。
2. Windows レジストリで `%appdata%` 変数を `\\cluster2016.com\DFS\FC12ClusterTemp` に直接変更します ([%appdata% 変数の変更](/ja/flexi-capture/admin-guide/fail-safety-proc#appdata-changing) を参照)。