> ## Documentation Index
> Fetch the complete documentation index at: https://docs.abbyy.com/llms.txt
> Use this file to discover all available pages before exploring further.

# Microsoft Azure ファイル共有に接続する

> ABBYY FlexiCapture Application Server を Microsoft Azure Files のファイル共有に接続し、資格情報を Credential Manager に保存して、IIS アプリケーション プールを設定します。

ABBYY FlexiCapture Application Server を Microsoft Azure のファイル共有に接続できます。

<Note>
  Microsoft Azure Files ですでにストレージ アカウントが作成されており、ABBYY FlexiCapture で使用できる状態であることを前提としています。
</Note>

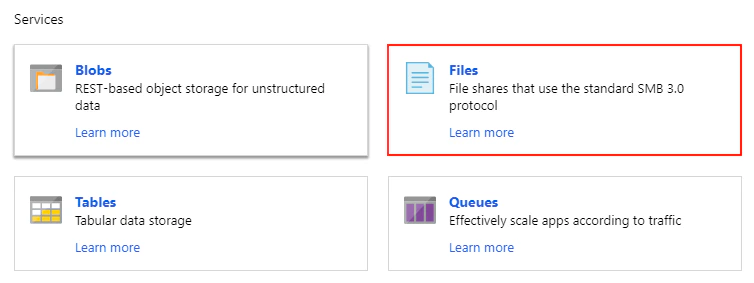
1. Azure ポータルでストレージ アカウント (この例では `abbyystorage`) を開き、ストレージ アカウント ペインで **Files** をクリックします。

<Frame>
  <img src="https://mintcdn.com/abbyy/39LtOHLEp1q7pm1x/images/flexi-capture/Azure_account_pane.png?fit=max&auto=format&n=39LtOHLEp1q7pm1x&q=85&s=a8d8d3e395085d39151626404c56c679" alt="abbyystorage ストレージ アカウント ペインが表示され、Files サービスが強調表示されている Microsoft Azure ポータルのスクリーンショット。" width="754" height="283" data-path="images/flexi-capture/Azure_account_pane.png" />
</Frame>

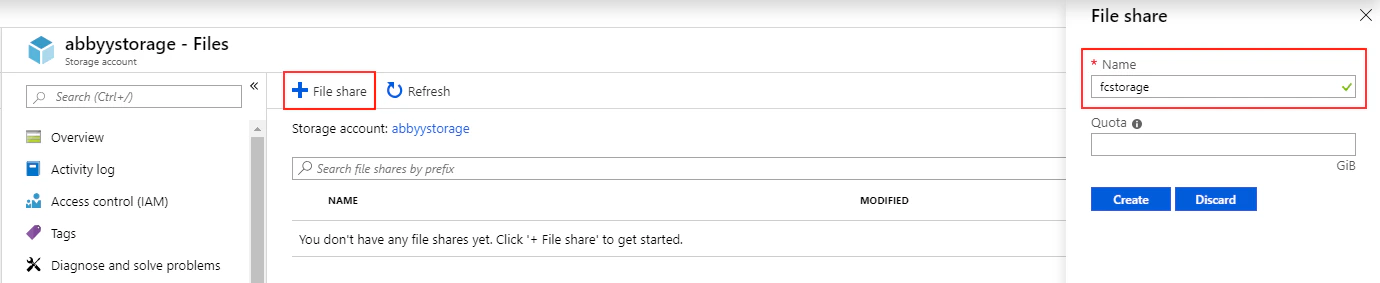
2. 名前 (この例では `fcstorage`) と必要に応じて容量クォータを指定して、ストレージ アカウントに新しいファイル共有を作成します。
<Frame>
  <img src="https://mintcdn.com/abbyy/39LtOHLEp1q7pm1x/images/flexi-capture/Azure_new_file_share.png?fit=max&auto=format&n=39LtOHLEp1q7pm1x&q=85&s=4ca4ef6e666f7b42686246616548119b" alt="fcstorage という名前の新しいファイル共有が、指定した名前とクォータで作成されている Microsoft Azure ポータルのスクリーンショット。" width="1380" height="283" data-path="images/flexi-capture/Azure_new_file_share.png" />
</Frame>

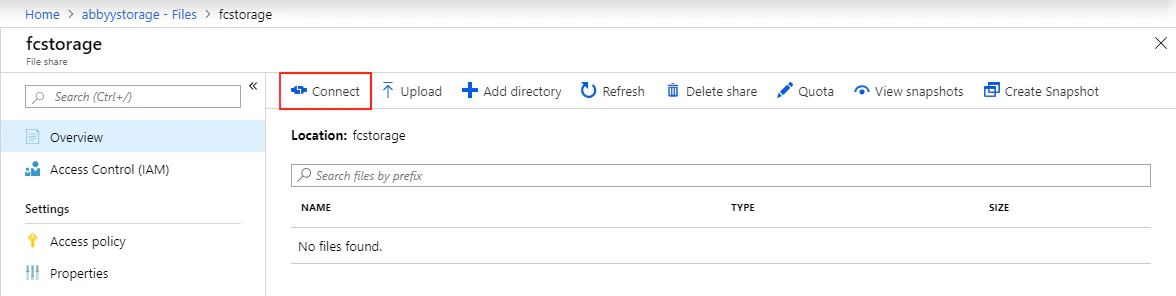
3. 作成したファイル共有を開き、**Connect** をクリックします。
<Frame>
  <img src="https://mintcdn.com/abbyy/39LtOHLEp1q7pm1x/images/flexi-capture/Azure_connect.png?fit=max&auto=format&n=39LtOHLEp1q7pm1x&q=85&s=cc1de0b7319fbfd035eda53a56504ef2" alt="作成したファイル共有が開かれ、Connect オプションが選択されている Microsoft Azure ポータルのスクリーンショット。" width="1176" height="296" data-path="images/flexi-capture/Azure_connect.png" />
</Frame>

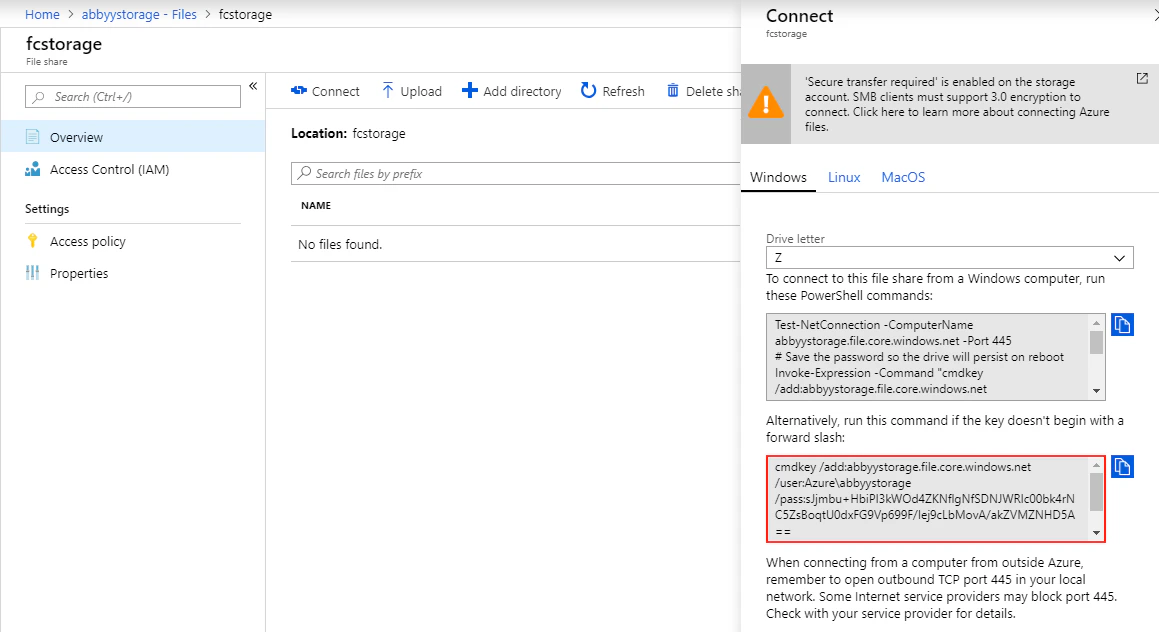
4. `cmdkey` コマンドを Clipboard にコピーします。

<Frame>
  <img src="https://mintcdn.com/abbyy/39LtOHLEp1q7pm1x/images/flexi-capture/Azure_cmdkey.png?fit=max&auto=format&n=39LtOHLEp1q7pm1x&q=85&s=68569de43cbabdc9ae52f73429015f24" alt="cmdkey コマンドが Clipboard にコピーされている Microsoft Azure ポータルの Connect ペインのスクリーンショット。" width="1159" height="632" data-path="images/flexi-capture/Azure_cmdkey.png" />
</Frame>

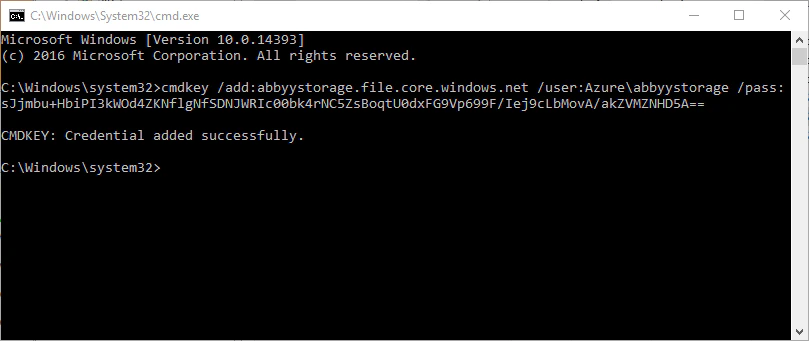
5. FlexiCapture Application Server がある仮想マシンに、FlexiCapture サービスにアクセスする権限を持つシステム ユーザー (この例では `fcuser`) としてログオンし、コマンドライン プロンプトを開いて、Clipboard から `cmdkey` コマンドを貼り付けて実行します。これにより、ファイル共有の資格情報が Windows Credential Manager に追加されます。
<Frame>
  <img src="https://mintcdn.com/abbyy/39LtOHLEp1q7pm1x/images/flexi-capture/Azure_cmdexe.png?fit=max&auto=format&n=39LtOHLEp1q7pm1x&q=85&s=1971f2c3fd9062e6d82ea27ea62a895b" alt="ファイル共有の資格情報を Windows Credential Manager に追加するために、cmdkey コマンドが貼り付けられて実行されている Windows コマンドライン プロンプトのスクリーンショット。" width="809" height="341" data-path="images/flexi-capture/Azure_cmdexe.png" />
</Frame>

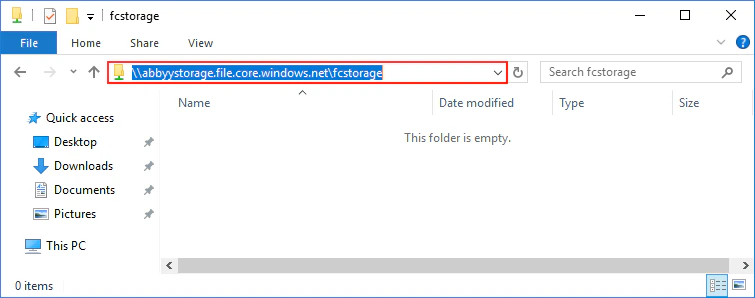
6. Windows Explorer を開き、ユーザーがファイル共有にアクセスできることを確認します。
<Frame>
  <img src="https://mintcdn.com/abbyy/39LtOHLEp1q7pm1x/images/flexi-capture/Azure_permissions.png?fit=max&auto=format&n=39LtOHLEp1q7pm1x&q=85&s=0ff570d9b7fc4733116f7ac998702732" alt="ユーザーが接続された Azure ファイル共有にアクセスできることを確認している Windows Explorer のスクリーンショット。" width="755" height="298" data-path="images/flexi-capture/Azure_permissions.png" />
</Frame>

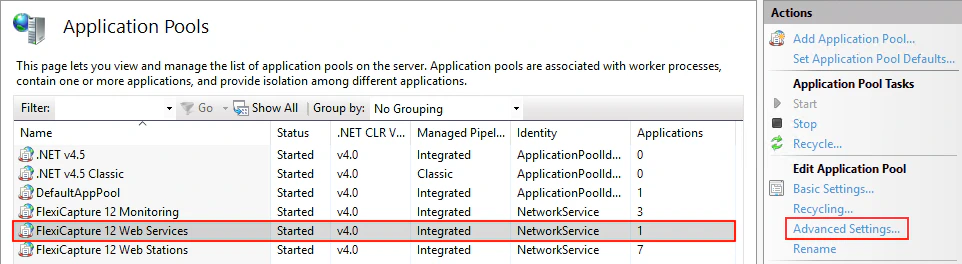
7. Internet Information Services (IIS) Manager を開き、FlexiCapture アプリケーション プールを選択して、**Advanced Settings** をクリックします。
<Frame>
  <img src="https://mintcdn.com/abbyy/39LtOHLEp1q7pm1x/images/flexi-capture/Azure_iismanager.png?fit=max&auto=format&n=39LtOHLEp1q7pm1x&q=85&s=3713d245ddba87e66344190e93175e0d" alt="FlexiCapture アプリケーション プールが選択され、Advanced Settings オプションが強調表示されている IIS Manager のスクリーンショット。" width="962" height="264" data-path="images/flexi-capture/Azure_iismanager.png" />
</Frame>

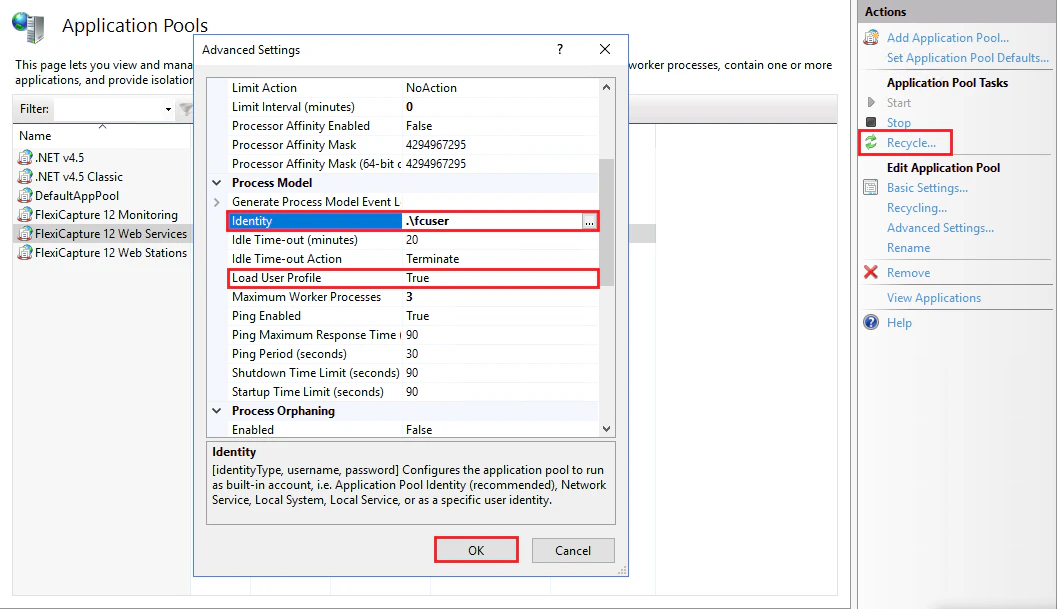
8. プールの ID を必要な権限を持つ FlexiCapture ユーザー アカウントに変更し、**Load User Profile** を **True** に設定して、**OK** をクリックして変更を確定し、アプリケーション プールをリサイクルします。
<Frame>
  <img src="https://mintcdn.com/abbyy/39LtOHLEp1q7pm1x/images/flexi-capture/Azure_pool_identity.png?fit=max&auto=format&n=39LtOHLEp1q7pm1x&q=85&s=9588427b5b5ab41d1496a909a7d010d0" alt="アプリケーション プールの ID が FlexiCapture ユーザー アカウントに設定され、Load User Profile が True に設定されている IIS Advanced Settings ダイアログのスクリーンショット。" width="1057" height="609" data-path="images/flexi-capture/Azure_pool_identity.png" />
</Frame>

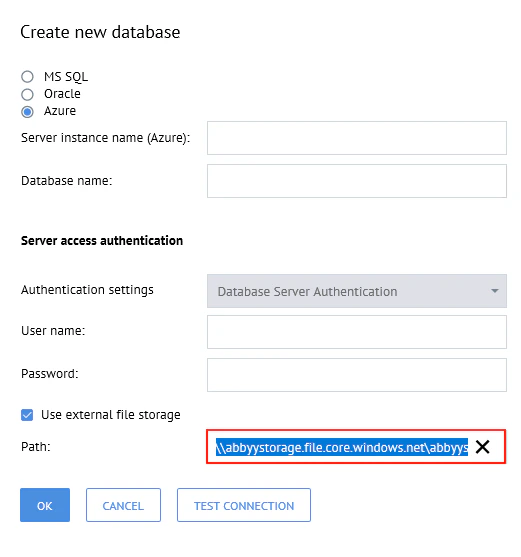
9. 管理および監視コンソールで、**Use external file storage** オプションを選択し、Microsoft Azure のファイル共有へのパスを指定します。
<Frame>
  <img src="https://mintcdn.com/abbyy/39LtOHLEp1q7pm1x/images/flexi-capture/Azure_new_db.png?fit=max&auto=format&n=39LtOHLEp1q7pm1x&q=85&s=de976cfe7b20af8c0601ad5c6f28d2c5" alt="Use external file storage オプションが選択され、Microsoft Azure ファイル共有のパスが指定されている管理および監視コンソールのスクリーンショット。" width="521" height="557" data-path="images/flexi-capture/Azure_new_db.png" />
</Frame>

<div id="use-azure-key-vault-to-connect-to-microsoft-azure-files">
  ## Azure Key Vault を使用して Microsoft Azure Files に接続する
</div>

Azure Key Vault は、API キー、パスワード、証明書などのシークレットを安全に保存するためのクラウド サービスです。このサービスを使用すると、Azure サブスクライバーはクラウド アプリケーションやサービスで使用される機密データを保護できます。Key Vault は Azure ポータル で作成および管理できます (詳細については [Microsoft のドキュメント](https://docs.microsoft.com/en-us/azure/key-vault/general/basic-concepts)を参照してください) 。

Azure Files への接続を設定するには、次の手順を実行します。

<div id="on-the-azure-portal">
  ### Azure ポータル上で
</div>

1. ABBYY FlexiCapture Application Server 用の 仮想マシン を設定します。
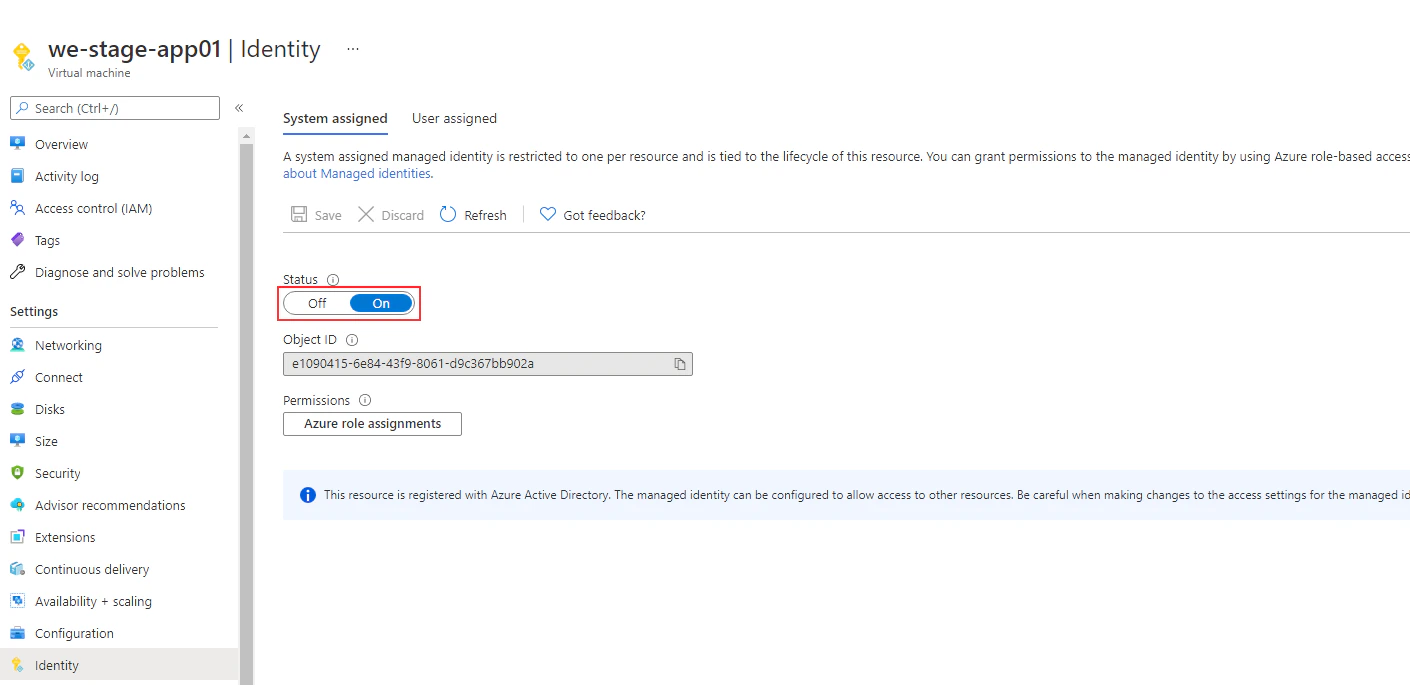
   **重要!** Application Server がインストールされている 仮想マシン は、Azure Active Directory に登録されている必要があります。仮想マシンの作成と設定の詳細については、[Microsoft のドキュメント](https://docs.microsoft.com/en-us/azure/active-directory/managed-identities-azure-resources/qs-configure-portal-windows-vm#system-assigned-managed-identity)を参照してください。

<Frame>
  <img src="https://mintcdn.com/abbyy/IFr-A2MDVJd80FDs/images/flexi-capture/File_storage_Azure_1.png?fit=max&auto=format&n=IFr-A2MDVJd80FDs&q=85&s=addf5d2df73fc5ddeda024823a9acf7b" alt="Azure Active Directory に登録された ABBYY FlexiCapture Application Server 用の仮想マシンが表示された Azure ポータルのスクリーンショット。" width="1410" height="685" data-path="images/flexi-capture/File_storage_Azure_1.png" />
</Frame>

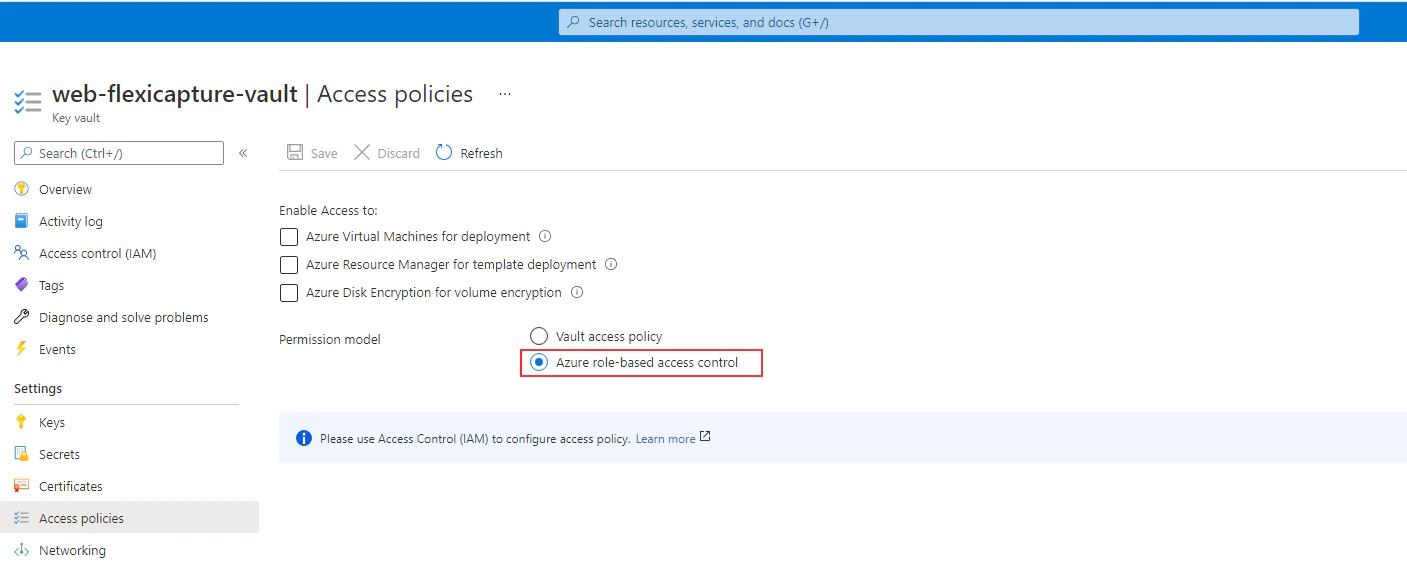
2. 新しい Key Vault を作成します。 **Permission model** で、**Azure role-based access control** を選択します。
<Frame>
  <img src="https://mintcdn.com/abbyy/IFr-A2MDVJd80FDs/images/flexi-capture/File_storage_Azure_2.png?fit=max&auto=format&n=IFr-A2MDVJd80FDs&q=85&s=0dc5ddcb7ffb5a8accc2ba0ce9218a9b" alt="Azure ポータルの「Create a key vault」ページで、**Permission model** の下に **Azure role-based access control** が選択されているスクリーンショット。" width="1407" height="572" data-path="images/flexi-capture/File_storage_Azure_2.png" />
</Frame>

3. シークレットを保存および表示できるようにするには、自分のアカウントに **Key Vault Secrets Officer** ロールを追加し、仮想マシン オブジェクトに **Key Vault Secrets User** ロールを追加します。仮想マシンにアクセス許可を付与する方法の詳細については、[Microsoft のドキュメント](https://docs.microsoft.com/en-us/azure/active-directory/managed-identities-azure-resources/tutorial-windows-vm-access-arm)を参照してください。
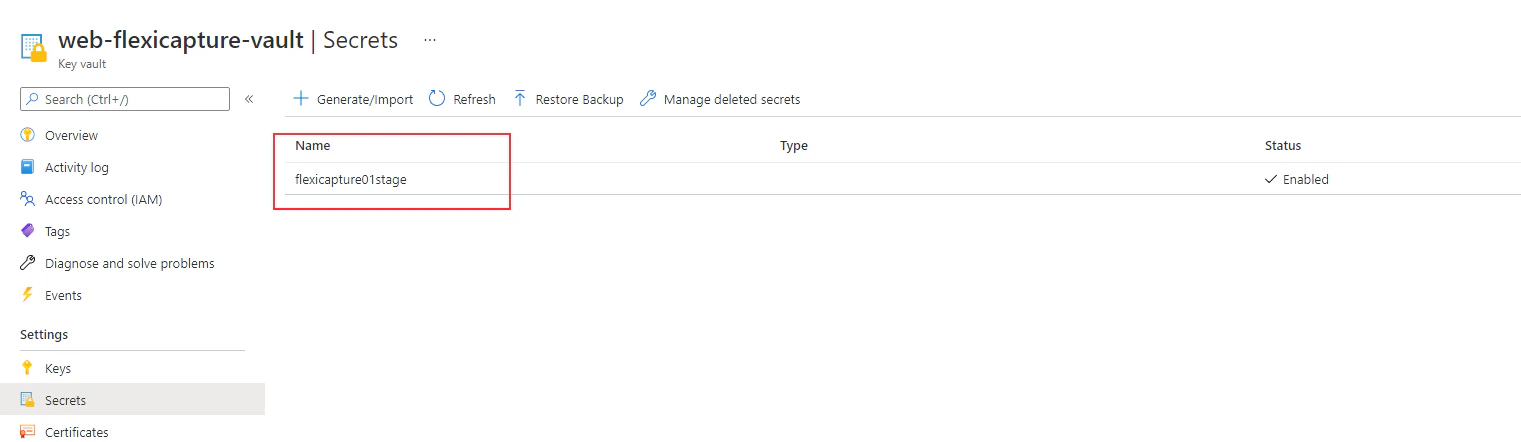
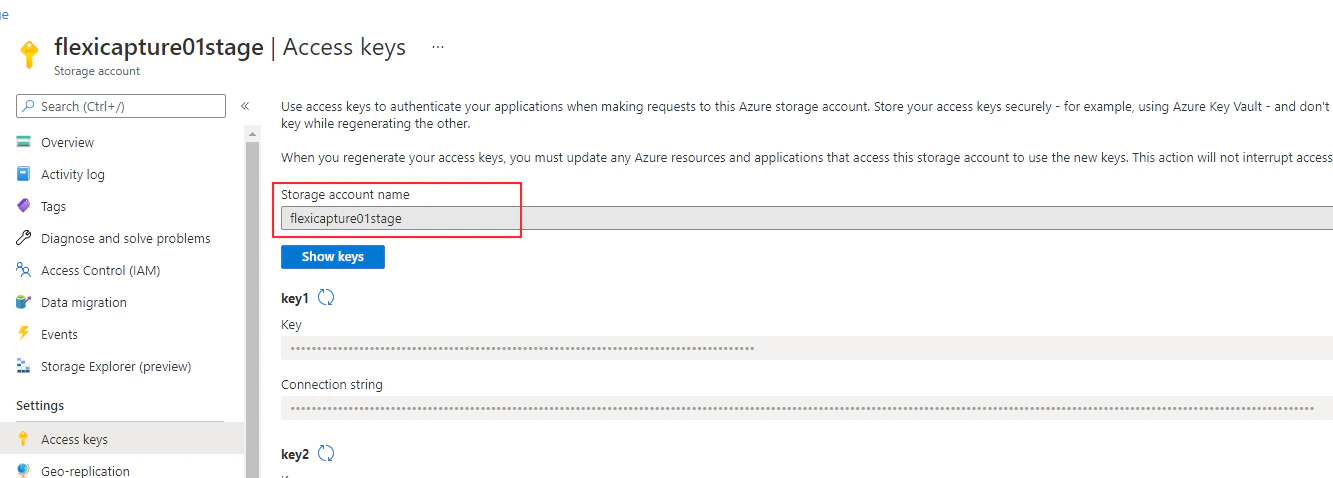
4. Azure Storage アカウントのシークレット (つまりアクセス キー) を Key Vault に追加します。Key Vault にシークレットを追加する方法の詳細については、[Microsoft のドキュメント](https://docs.microsoft.com/en-us/azure/key-vault/secrets/quick-create-portal#add-a-secret-to-key-vault)を参照してください。
   **重要!** Azure Files に接続するには、シークレットの名前がストレージ アカウント名と同じである必要があります。
<Frame>
  <img src="https://mintcdn.com/abbyy/IFr-A2MDVJd80FDs/images/flexi-capture/File_storage_Azure_3.png?fit=max&auto=format&n=IFr-A2MDVJd80FDs&q=85&s=1a8031578f1c5fbef24344dddf1f643f" alt="シークレット名が Azure Storage アカウント名と一致するシークレットが Key Vault に追加されている Azure ポータルのスクリーンショット。" width="1333" height="478" data-path="images/flexi-capture/File_storage_Azure_3.png" />
</Frame>

<Frame>
  <img src="https://mintcdn.com/abbyy/IFr-A2MDVJd80FDs/images/flexi-capture/File_storage_Azure_4.png?fit=max&auto=format&n=IFr-A2MDVJd80FDs&q=85&s=e8a99e9392f2122c03f9fcb6655284eb" alt="Key Vault のシークレットとして使用するアクセス キーをコピーする Azure ポータルの Azure Storage アカウントの Access keys ページのスクリーンショット。" width="1521" height="442" data-path="images/flexi-capture/File_storage_Azure_4.png" />
</Frame>

<div id="on-each-application-server">
  ### 各 Application Server で
</div>

Azure Files にアクセスできるよう、システム アカウントを構成します。手順は次のとおりです。

1. Application Server がインストールされている各仮想マシンに、次の PowerShell スクリプトを保存します。

```powershell theme={null}
Param(
    [Parameter(Mandatory=$true)][Alias("Share")][ValidateNotNullOrEmpty()][String]$ShareRoot,
    [Parameter(Mandatory=$true)][Alias("Uri")][ValidateNotNullOrEmpty()][String]$VaultUri
)

$StorageAccount = $ShareRoot | Select-String -pattern "(?<=\\)(.*?)(?=(\\|[.]))" | Select-Object -ExpandProperty Matches | Select-Object -ExpandProperty Value
$ShareUser = "Azure\" + $StorageAccount

# Azure Key Vaultからパラメーターを取得する
$Response = Invoke-RestMethod -UseBasicParsing -Uri 'https://169.254.169.254/metadata/identity/oauth2/token?api-version=2018-02-01&resource=https%3A%2F%2Fvault.azure.net' -Method GET -Headers @{Metadata="true"}
$BearerToken = $Response.access_token

# SharePass（共有パスワード）
$Uri = ($VaultUri).TrimEnd('/') + "/secrets/" + $StorageAccount + "?api-version=2016-10-01"
$Response = Invoke-RestMethod -UseBasicParsing -Uri $Uri -Method GET -Headers @{Authorization="Bearer $BearerToken"}
$SharePass = $Response.value
$ShareCredential = New-Object PSCredential($ShareUser, (ConvertTo-SecureString -AsPlainText -Force -String $SharePass))

New-PSDrive -Name "Flexicapture" -PSProvider FileSystem -Root $ShareRoot -Credential $ShareCredential -Scope Global
```

スクリプトは、入力として次の 2 つのパラメーターを受け取ります。

* ネットワーク Azure フォルダーのルート パス。例: `\\<name of Azure Storage account>.file.core.windows.net\<name of network folder>`。
* Azure Storage アカウント のアクセス キーを格納する Key Vault の URI。URI は、Azure ポータルの **Overview** タブにある **Vault URI** field からコピーできます。

<Frame>
  <img src="https://mintcdn.com/abbyy/IFr-A2MDVJd80FDs/images/flexi-capture/File_storage_Azure_5.png?fit=max&auto=format&n=IFr-A2MDVJd80FDs&q=85&s=2035d262c9172a9d2bc10d3b01d936c5" alt="Azure ポータルの Key Vault の Overview タブで、Vault URI field が強調表示されているスクリーンショット。" width="1755" height="336" data-path="images/flexi-capture/File_storage_Azure_5.png" />
</Frame>

スクリプトを実行するためのサンプル コマンド:

```powershell theme={null}
powershell.exe <path to file with script> -share \\<name of Azure Storage account>.file.core.windows.net\<name of network folder> -uri https://<name of Azure key vault>.vault.azure.net/
```

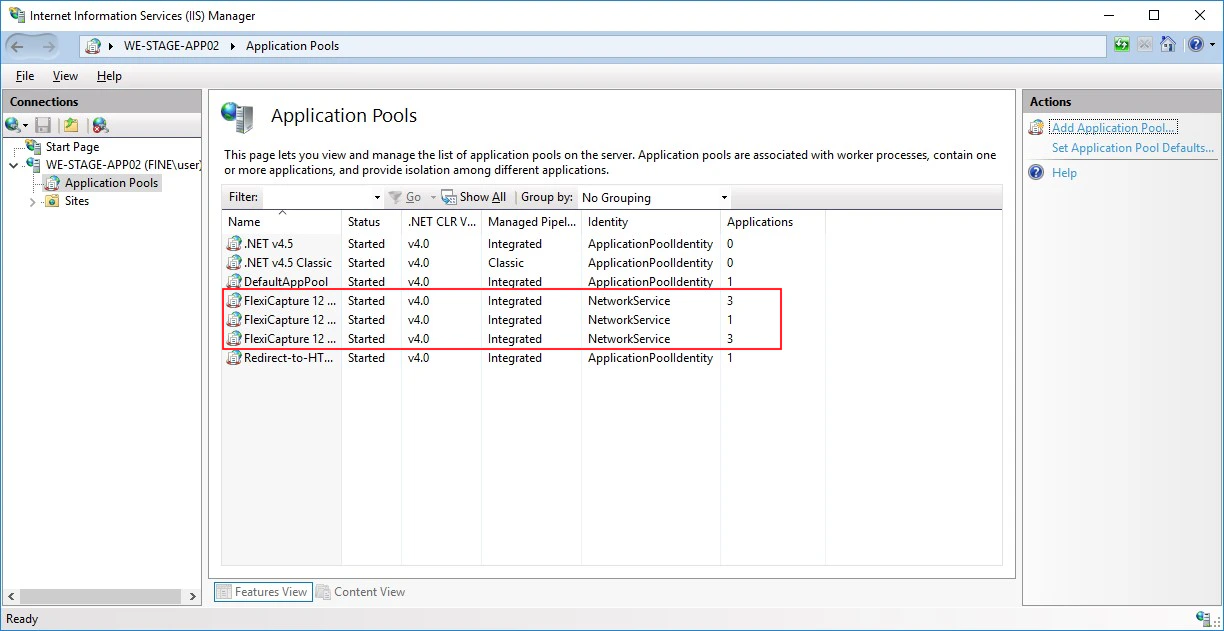
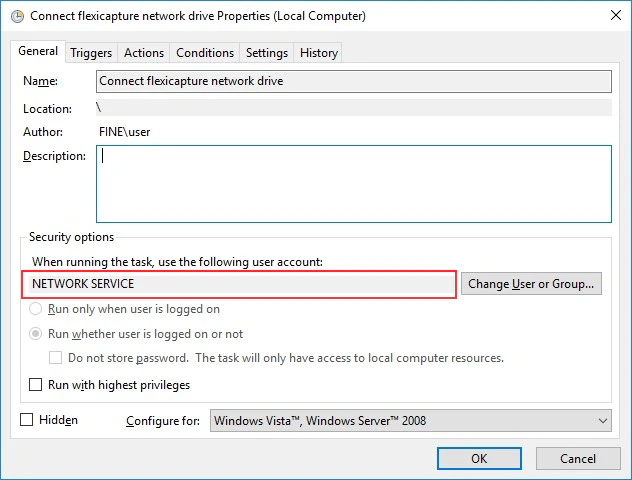
2. スクリプトを実行するには、システム起動イベントをトリガーとして実行されるタスクを Task Scheduler で作成します。このタスクは、System、Network Service、または Local Service のユーザー アカウントで実行する必要があります。IIS のアプリケーション プールも同じアカウントで実行する必要があります。

<Frame>
  <img src="https://mintcdn.com/abbyy/IFr-A2MDVJd80FDs/images/flexi-capture/File_storage_Azure_6.png?fit=max&auto=format&n=IFr-A2MDVJd80FDs&q=85&s=b3ca334b0a2aaaaaecbd00e3ce79639d" alt="システム起動イベントをトリガーとして実行される新しいタスクを示す Task Scheduler のスクリーンショット。" width="632" height="480" data-path="images/flexi-capture/File_storage_Azure_6.png" />
</Frame>

<Frame>
  <img src="https://mintcdn.com/abbyy/IFr-A2MDVJd80FDs/images/flexi-capture/File_storage_Azure_7.png?fit=max&auto=format&n=IFr-A2MDVJd80FDs&q=85&s=6718f173e9e638a04fcd71383fb43252" alt="IIS のアプリケーション プールと同じ System アカウントで実行するよう構成された Task Scheduler タスクのスクリーンショット。" width="1224" height="631" data-path="images/flexi-capture/File_storage_Azure_7.png" />
</Frame>

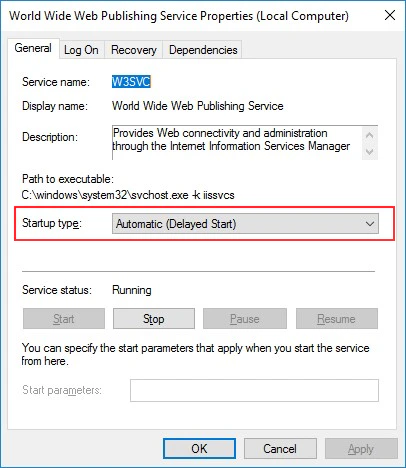
3. 接続スクリプトの実行後に IIS サービスが起動するように構成します。これを行うには、**World Wide Web Publishing Service Properties** ダイアログを開き、**General** タブの **Startup type** ドロップダウンリストから **Automatic (Delayed Start)** を選択します。
<Frame>
  <img src="https://mintcdn.com/abbyy/IFr-A2MDVJd80FDs/images/flexi-capture/File_storage_Azure_8.png?fit=max&auto=format&n=IFr-A2MDVJd80FDs&q=85&s=808736bd756a29f23cac95a86b340266" alt="Startup type が Automatic (Delayed Start) に設定された World Wide Web Publishing Service Properties ダイアログのスクリーンショット。" width="406" height="468" data-path="images/flexi-capture/File_storage_Azure_8.png" />
</Frame>

4. Application Server を再起動します。