> ## Documentation Index
> Fetch the complete documentation index at: https://docs.abbyy.com/llms.txt
> Use this file to discover all available pages before exploring further.

# 要素リレーションの生成

> FlexiLayout StudioのReference layoutから要素リレーションを学習します。参照要素を選択し、生成されたリレーションを確認して、必要なものを保存します。

要素に対して[相対検索領域](/ja/flexi-capture/fls/template/relations)を手動で指定するだけでなく、選択したページのReference layoutに基づいて要素リレーションを学習することもできます。

<div id="prerequisites-for-relation-training">
  ## リレーション学習の前提条件
</div>

* **Reference layout**に、リレーションを生成する対象の要素が含まれている必要があります。
* トレーニングセットに含めるすべてのページが、**Batch**タブで**Use for Training**に設定されている必要があります。

<Note>
  学習対象の要素は、リレーションの作成元となる要素よりも要素ツリーの下位に配置されている必要があります。すべての要素は非反復でなければなりません。
</Note>

<div id="generate-element-relations">
  ## 要素のリレーションを生成する
</div>

<Steps>
  <Step title="Select Element ダイアログを開く">
    要素のショートカットメニューで、**Train Element** → **Generate Element Relations** を選択します。**Select Element** ダイアログが開きます。
  </Step>

  <Step title="リレーションの生成対象となる要素を選択する">
    <img src="https://mintcdn.com/abbyy/fmgRWFNHKYN2MLSg/images/flexi-capture/fls/Button_Right.gif?fit=max&auto=format&n=fmgRWFNHKYN2MLSg&q=85&s=e5bbccc3203ef5f931d294c79aa2293f" alt="選択した要素を追加するボタン" style={{display:"inline-block",verticalAlign:"middle",margin:0}} width="27" height="18" data-path="images/flexi-capture/fls/Button_Right.gif" /> (選択した要素を追加) または <img src="https://mintcdn.com/abbyy/fmgRWFNHKYN2MLSg/images/flexi-capture/fls/Button_All_Right.gif?fit=max&auto=format&n=fmgRWFNHKYN2MLSg&q=85&s=749dfbf28d3479073569e0b2fb77236b" alt="すべての要素を追加するボタン" style={{display:"inline-block",verticalAlign:"middle",margin:0}} width="27" height="18" data-path="images/flexi-capture/fls/Button_All_Right.gif" /> (使用可能なすべての要素を追加) をクリックするか、要素をダブルクリックして、ウィンドウの右側に要素を追加します。選択した要素は、ウィンドウの左側で太字表示されます。
  </Step>

  <Step title="OK をクリックする">
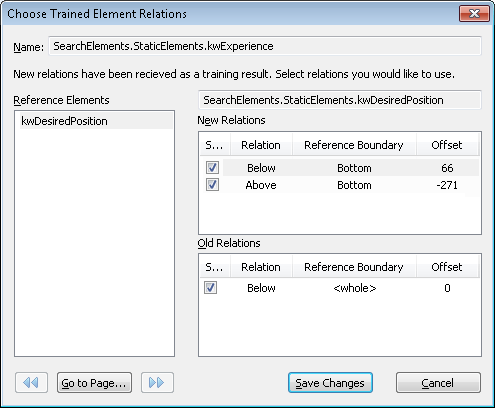
    **Choose Trained Element Relations** ダイアログが開きます。このダイアログには 3 つのリストがあります:

    * **参照要素** – リレーションの作成元となった要素。
    * **New Relations** – 学習によって取得された新しいリレーション。
    * **Old Relations** – 以前に作成されたリレーション。

    <Frame>
      <img src="https://mintcdn.com/abbyy/r-nfa7jujx5b9gKX/images/flexi-capture/fls/relation_generate.PNG?fit=max&auto=format&n=r-nfa7jujx5b9gKX&q=85&s=369be3f245e1a333d8400c3cdb3d51a3" alt="Choose Trained Element Relationsダイアログのスクリーンショット。参照要素リストと、リレーションの型、参照境界、オフセット値を含むNew RelationsおよびOld Relationsリストが表示されている。" width="495" height="408" data-path="images/flexi-capture/fls/relation_generate.PNG" />
    </Frame>
  </Step>

  <Step title="画像上でリレーションをプレビューする">
    リスト内のリレーションを選択すると、**Image** ウィンドウでその表示を確認できます。**Image** ウィンドウ内の参照要素は太い枠で囲まれ、検索領域は緑色の背景で強調表示されます。

    <Note>
      複数のリレーションを選択すると、それらの共通部分が表示されます。共通部分は緑色の背景で強調表示され、共通部分の外側の領域は青で強調表示されます。
    </Note>
  </Step>

  <Step title="トレーニングセット内の他のページでリレーションを表示する">
    トレーニングセットの次または前のページで可視化されたリレーションを表示するには、ウィンドウ左下にある <img src="https://mintcdn.com/abbyy/fmgRWFNHKYN2MLSg/images/flexi-capture/fls/Button_All_Left.gif?fit=max&auto=format&n=fmgRWFNHKYN2MLSg&q=85&s=6f3826db16635949999496b43c4dde6e" alt="前のページボタン" style={{display:"inline-block",verticalAlign:"middle",margin:0}} width="27" height="18" data-path="images/flexi-capture/fls/Button_All_Left.gif" /> と <img src="https://mintcdn.com/abbyy/fmgRWFNHKYN2MLSg/images/flexi-capture/fls/Button_All_Right.gif?fit=max&auto=format&n=fmgRWFNHKYN2MLSg&q=85&s=749dfbf28d3479073569e0b2fb77236b" alt="次のページボタン" style={{display:"inline-block",verticalAlign:"middle",margin:0}} width="27" height="18" data-path="images/flexi-capture/fls/Button_All_Right.gif" /> をそれぞれクリックします。指定したページ番号に移動するには、**Go to Page...** ボタンをクリックします。
  </Step>

  <Step title="リレーションを保存する">
    使用するリレーションのチェックボックスをオンにして、**Save Changes** ボタンをクリックします。
  </Step>
</Steps>
