> ## Documentation Index
> Fetch the complete documentation index at: https://docs.abbyy.com/llms.txt
> Use this file to discover all available pages before exploring further.
# サンプル 3. ステップ 1: 事前設定
> 請求書の sample プロジェクトを準備します。ABBYY FlexiLayout Studio で Sample3 を作成し、テスト画像を追加して、FlexiLayout の pre-recognition 設定を行います。
1. 新しいフォルダーを作成し、**Invoices One-Page** という名前を付けます。
2. ABBYY FlexiLayout Studio を起動します。
3. 新しいプロジェクトを作成し、**Sample3** という名前を付けます。詳細は [チュートリアル 1、ステップ 1](/ja/flexi-capture/fls/tutorial/step1) を参照してください。
4. バッチに画像を追加します。詳細は [チュートリアル 1、ステップ 2](/ja/flexi-capture/fls/tutorial/step2) を参照してください。
チュートリアル 3 のテスト画像は `%public%\ABBYY\FlexiCapture\12.0\Samples\FLS\English\Invoice One-Page\Invoice One-PageBatch\\Images\bwPage.frdat` に保存されています。
5. FlexiLayout のプロパティを設定します。詳細は [チュートリアル 1、ステップ 3](/ja/flexi-capture/fls/tutorial/step3) を参照してください。
* **テキストタイプ** で Typographic を選択します。
* Text languages で **English** を選択します。なお、プログラムでは複数の言語を指定できます。
* FlexiLayout に **Invoice** という名前を付けます。
* Fast pre-recognition モードを選択し、**Minimum number of pages** と **Maximum number of pages** を 1 に設定します。
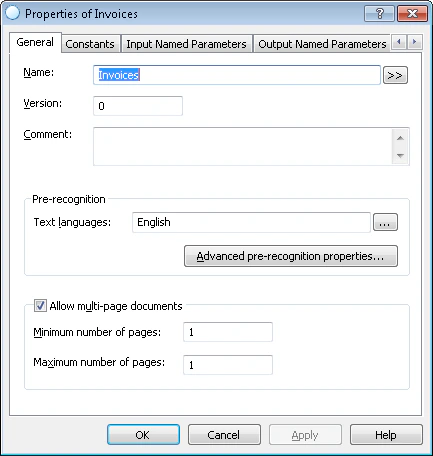 適切な pre-recognition パラメーターの選択について詳しくは、[チュートリアル 1、ステップ 3](/ja/flexi-capture/fls/tutorial/step3) を参照してください。
1 ページの文書では、文書の先頭と末尾を示すために、事前定義された複合 Header 要素と Footer 要素を使用する必要はありません。したがって、FlexiLayout 要素のリストからこれらを削除できます。
文書の先頭と末尾を示すために、FlexiLayout に Header 要素と Footer 要素を追加できます。FlexiLayout のマッチング時に Header 要素も Footer 要素も見つからない場合、プログラムは FlexiLayout で指定された最大ページ数をその文書のページ数として使用します。この文書では、最大ページ数は 1 に設定されています。
適切な pre-recognition パラメーターの選択について詳しくは、[チュートリアル 1、ステップ 3](/ja/flexi-capture/fls/tutorial/step3) を参照してください。
1 ページの文書では、文書の先頭と末尾を示すために、事前定義された複合 Header 要素と Footer 要素を使用する必要はありません。したがって、FlexiLayout 要素のリストからこれらを削除できます。
文書の先頭と末尾を示すために、FlexiLayout に Header 要素と Footer 要素を追加できます。FlexiLayout のマッチング時に Header 要素も Footer 要素も見つからない場合、プログラムは FlexiLayout で指定された最大ページ数をその文書のページ数として使用します。この文書では、最大ページ数は 1 に設定されています。