> ## Documentation Index
> Fetch the complete documentation index at: https://docs.abbyy.com/llms.txt
> Use this file to discover all available pages before exploring further.

# サンプル 3. ステップ 26: InvoiceTable 要素 を使用した テーブル要素 の検出

> InvoiceTable テーブル要素 を構成します。列、列順ルール、ヘッダー、フッター、マスター列を設定して、請求書テーブルを確実に検出します。

これですべての準備が整ったので、Invoice Table field を検索できます。まず、型が [Table](/ja/flexi-capture/fls/tables/general-tables) の 要素 を記述します。

1. **テーブルの ヘッダー を記述します。** [Step 13](/ja/flexi-capture/fls/tutorial3/3step13) で決めたとおり、**Reference** 列と **Designation** 列の名前はキーワードで記述し (**Table** 要素 → **プロパティ** ダイアログ → **Columns** タブ → column **プロパティ** ダイアログ)、**数量**、**単価**、**合計金額** の各列名は、前に記述した補助 要素 を使って検出します。
2. **テーブルの フッター を記述します。** [Step 13](/ja/flexi-capture/fls/tutorial3/3step13) で決めたとおり、フッター は、キーワードやフレーズを使って フッター の先頭を見つける、前に記述した 要素 を使って検出します。
3. **テーブルの search area を記述します。** 右側の検索範囲を制限するため、**Sales** 列名を使用します。

<div id="create-the-invoicetable-element">
  ## InvoiceTable 要素を作成する
</div>

**InvoiceTable** 要素を作成するには、次の手順に従います。

1. 型 [テーブル](/ja/flexi-capture/fls/tables/general-tables) の要素を作成し、名前を **InvoiceTable** にします。
2. **Columns** タブをクリックします。
3. **Select** をクリックし、前述の **InvoiceTable** ブロックを **InvoiceTable** 要素で検出するブロックとして指定します。詳細な手順については、[Step 3](/ja/flexi-capture/fls/tutorial3/3step3) を参照してください。
4. **Reference** 列を選択して **プロパティ...** をクリックします。この列名の検索にはキーワード **Reference** を使用するため、デフォルト値のままにします。
5. **Designation** 列を選択して **プロパティ...** をクリックします。この列名の検索にはキーワード **Designation** を使用するため、デフォルト値のままにします。
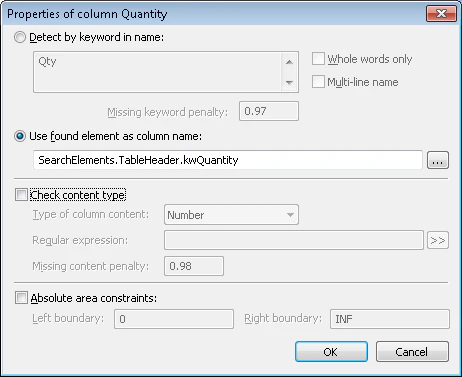
6. **数量** 列を選択して **プロパティ...** をクリックします。この列名の検出には、前に検出した要素 `TableHeader.kwQuantity` を使用します。**Use found element as column name** オプションを選択し、<img src="https://mintcdn.com/abbyy/fmgRWFNHKYN2MLSg/images/flexi-capture/fls/Browse_Button.gif?s=3673db30dda4a3293aec716853588b55" alt="" style={{display:"inline-block",verticalAlign:"middle",margin:0}} width="21" height="20" data-path="images/flexi-capture/fls/Browse_Button.gif" /> をクリックして `TableHeader.kwQuantity` 要素を選択します。
<Frame>
  <img src="https://mintcdn.com/abbyy/r-nfa7jujx5b9gKX/images/flexi-capture/fls/tutorial3_26_1.png?fit=max&auto=format&n=r-nfa7jujx5b9gKX&q=85&s=bbf25b0bc0343d5c5c77393f46a0f892" alt="ABBYY FlexiLayout Studio の 数量 列のプロパティダイアログのスクリーンショット。Use found element as column name が選択され、SearchElements.TableHeader.kwQuantity に設定されています。" width="462" height="377" data-path="images/flexi-capture/fls/tutorial3_26_1.png" />
</Frame>

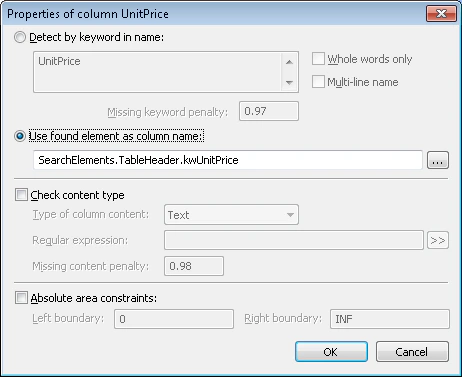
1. **UnitPrice** 列を選択して **プロパティ...** をクリックします。この列名の検出には、前に検出した要素 `TableHeader.kwUnitPrice` を使用します。**Use found element as column name** オプションを選択し、<img src="https://mintcdn.com/abbyy/fmgRWFNHKYN2MLSg/images/flexi-capture/fls/Browse_Button.gif?s=3673db30dda4a3293aec716853588b55" alt="" style={{display:"inline-block",verticalAlign:"middle",margin:0}} width="21" height="20" data-path="images/flexi-capture/fls/Browse_Button.gif" /> をクリックして `TableHeader.kwUnitPrice` 要素を選択します。
<Frame>
  <img src="https://mintcdn.com/abbyy/r-nfa7jujx5b9gKX/images/flexi-capture/fls/tutorial3_26_2.png?fit=max&auto=format&n=r-nfa7jujx5b9gKX&q=85&s=b659e5d615579177f79b061be15ed775" alt="ABBYY FlexiLayout Studio の UnitPrice 列のプロパティダイアログのスクリーンショット。Use found element as column name が選択され、SearchElements.TableHeader.kwUnitPrice に設定されています。" width="462" height="377" data-path="images/flexi-capture/fls/tutorial3_26_2.png" />
</Frame>

1. **合計金額** 列を選択して **プロパティ...** をクリックします。この列名の検出には、前に検出した要素 `TableHeader.kwTotal` を使用します。**Use found element as column name** オプションを選択し、<img src="https://mintcdn.com/abbyy/fmgRWFNHKYN2MLSg/images/flexi-capture/fls/Browse_Button.gif?s=3673db30dda4a3293aec716853588b55" alt="" style={{display:"inline-block",verticalAlign:"middle",margin:0}} width="21" height="20" data-path="images/flexi-capture/fls/Browse_Button.gif" /> をクリックして `TableHeader.kwTotal` 要素を選択します。
2. **Order** タブをクリックします。
3. 対象の列の間に別の列 (たとえば **Unit**) が入ることがありますが、対象の列は常に **Reference**、**Designation**、**数量**、**単価**、**合計金額** の順に並びます。**Rules for column order** オプションを選択し、**Add...** をクリックして、次の列順を指定します: `Reference << Designation << Quantity << Unit Price << Total`.
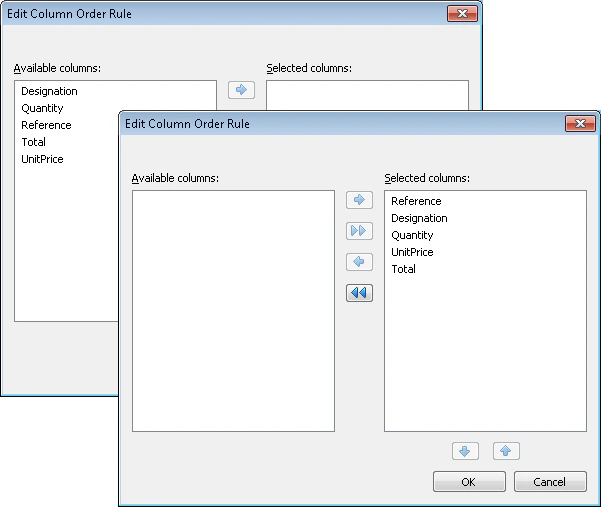
<Frame>
  <img src="https://mintcdn.com/abbyy/r-nfa7jujx5b9gKX/images/flexi-capture/fls/tutorial3_26_3.png?fit=max&auto=format&n=r-nfa7jujx5b9gKX&q=85&s=b471ef36cc0fb3b34730fd749baf7c1b" alt="ABBYY FlexiLayout Studio の SearchElements.InvoiceTable ダイアログのプロパティにある Order タブのスクリーンショット。Rules for column order が選択され、Reference、Designation、数量、単価、合計金額 の順序を示すルールが表示されています。" width="601" height="507" data-path="images/flexi-capture/fls/tutorial3_26_3.png" />
</Frame>

**Edit Column Order Rule** ダイアログで、列を **Reference**、**Designation**、**数量**、**UnitPrice**、**合計金額** の順に **Selected columns** リストへ移動します。
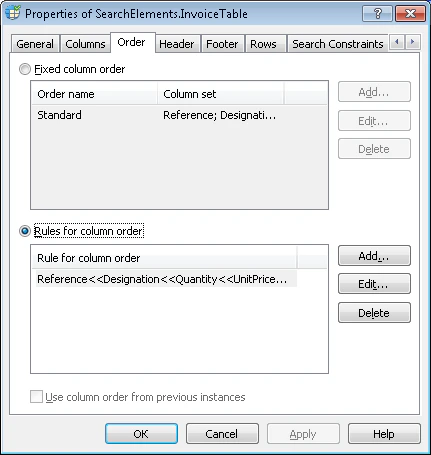
<Frame>
  <img src="https://mintcdn.com/abbyy/8aWHPAJyzWmTqglX/images/flexi-capture/fls/tutorial3_26_4.png?fit=max&auto=format&n=8aWHPAJyzWmTqglX&q=85&s=dc2e164e6c1d5179ae56fb3614cf780b" alt="ABBYY FlexiLayout Studio の 2 つの Edit Column Order Rule ダイアログのスクリーンショット。使用可能な列が、Reference、Designation、数量、UnitPrice、合計金額 の順で Selected columns リストに移動されています。" width="431" height="455" data-path="images/flexi-capture/fls/tutorial3_26_4.png" />
</Frame>

1. **ヘッダー** タブをクリックします。ヘッダーは必要ですが、検索条件は追加しないため、デフォルト値のままにします。
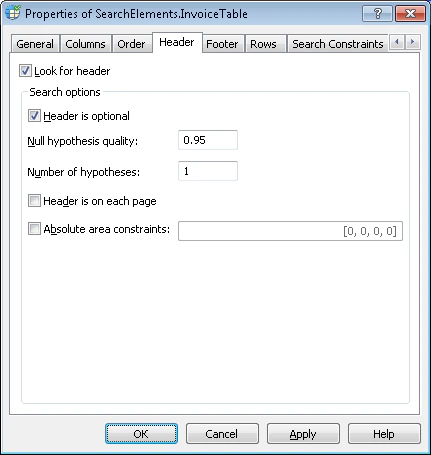
<Frame>
  <img src="https://mintcdn.com/abbyy/8aWHPAJyzWmTqglX/images/flexi-capture/fls/tutorial3_26_5.png?fit=max&auto=format&n=8aWHPAJyzWmTqglX&q=85&s=bb84010302437fe5fe0423ab877b9fcb" alt="ABBYY FlexiLayout Studio の SearchElements.InvoiceTable ダイアログのプロパティにある ヘッダー タブのスクリーンショット。Look for header と Header is optional が選択され、デフォルトの検索オプションが表示されています。" width="431" height="455" data-path="images/flexi-capture/fls/tutorial3_26_5.png" />
</Frame>

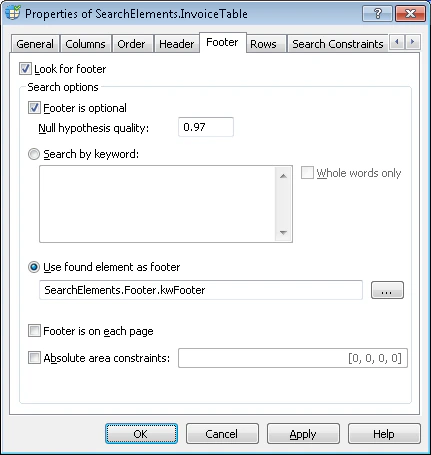
1. フッター タブをクリックします。フッターの検出には、先に検出した要素 `Footer.kwFooter` を使用します。Use found element as footer オプションを選択し、<img src="https://mintcdn.com/abbyy/fmgRWFNHKYN2MLSg/images/flexi-capture/fls/Browse_Button.gif?s=3673db30dda4a3293aec716853588b55" alt="参照ボタン" style={{display:"inline-block",verticalAlign:"middle",margin:0}} width="21" height="20" data-path="images/flexi-capture/fls/Browse_Button.gif" /> をクリックして `Footer.kwFooter` 要素を選択します。

<Frame>
  <img src="https://mintcdn.com/abbyy/8aWHPAJyzWmTqglX/images/flexi-capture/fls/tutorial3_26_6.png?fit=max&auto=format&n=8aWHPAJyzWmTqglX&q=85&s=70b7018b068999171888a3ff75203a36" alt="ABBYY FlexiLayout Studio の SearchElements.InvoiceTable の プロパティ ダイアログの フッター タブのスクリーンショット。Use found element as footer が選択され、SearchElements.Footer.kwFooter に設定されています。" width="431" height="455" data-path="images/flexi-capture/fls/tutorial3_26_6.png" />
</Frame>

1. Rows タブをクリックします。
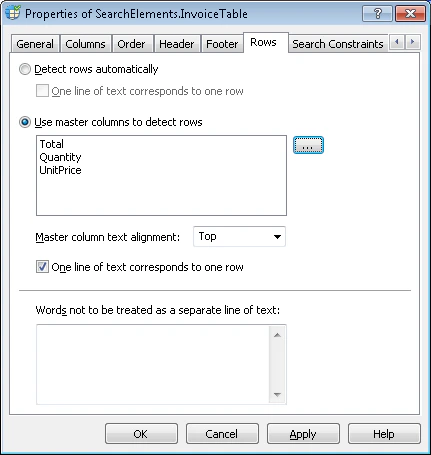
2. テーブル内の一部の列には複数行のエントリが含まれる場合があるため、行を検出するためのマスター列を指定する必要があります。Use master columns to detect rows オプションを選択します。

   この列には常にデータが含まれ、各エントリがテーブルの1行に対応するため、主マスター列として **合計金額** 列を指定します。この列がドキュメント上で検出されない場合に備えて、2番目と3番目のマスター列として、それぞれ **数量** 列と **単価** 列を指定します。<img src="https://mintcdn.com/abbyy/fmgRWFNHKYN2MLSg/images/flexi-capture/fls/Browse_Button.gif?s=3673db30dda4a3293aec716853588b55" alt="参照ボタン" style={{display:"inline-block",verticalAlign:"middle",margin:0}} width="21" height="20" data-path="images/flexi-capture/fls/Browse_Button.gif" /> をクリックし、この順序でマスター列を指定します。

<Frame>
  <img src="https://mintcdn.com/abbyy/8aWHPAJyzWmTqglX/images/flexi-capture/fls/tutorial3_26_7.png?fit=max&auto=format&n=8aWHPAJyzWmTqglX&q=85&s=444df4f217866eba9a7be6842251d490" alt="ABBYY FlexiLayout Studio の SearchElements.InvoiceTable の プロパティ ダイアログの Rows タブのスクリーンショット。Use master columns to detect rows が選択され、マスター列として 合計金額、数量、UnitPrice が一覧表示されています。" width="431" height="455" data-path="images/flexi-capture/fls/tutorial3_26_7.png" />
</Frame>

1. Relations タブをクリックします。目的の列は **Sales** 列名の先頭より左側 (少し間隔を空けた位置) にあるため、次の検索制約を設定します。

   * 要素 `TableHeader.kwSales` の **Left of**
   * **Offset** = -40、**Reference boundary** = **Left**。
   <Tip>
     オフセット値を選択する際は、事前認識で検出された参照オブジェクトと対象オブジェクトの幾何学的プロパティ (サイズや境界など) を分析するとよいでしょう。そうしないと、これらの値は試行錯誤で決めることになります。
   </Tip>

2. テスト画像に対して FlexiLayout をマッチングします。テーブル要素が存在するすべての画像で、プログラムが正常に検出できていることがわかります。

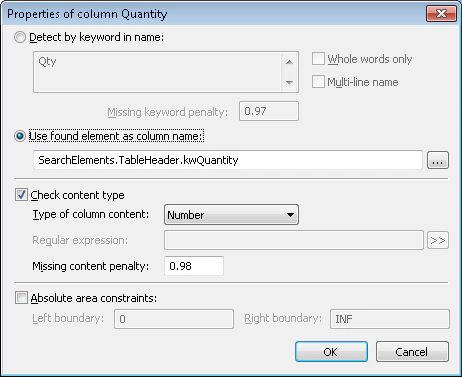
   ただし、一部の画像では **数量** 列に前の列の不要なアーティファクトも含まれています。有用なデータをノイズから分離するため、この列に現れる可能性のあるコンテンツの型を指定します。

3. **InvoiceTable** 要素の プロパティ ダイアログを開きます。Columns タブをクリックし、**数量** 列の プロパティ ダイアログを開いて、Check content type オプションを選択します。Type of column content ドロップダウンリストで **Number** を選択します。

<Frame>
  <img src="https://mintcdn.com/abbyy/8aWHPAJyzWmTqglX/images/flexi-capture/fls/tutorial3_26_8.png?fit=max&auto=format&n=8aWHPAJyzWmTqglX&q=85&s=f9b88f0e33915159a4be7cddf32467c2" alt="ABBYY FlexiLayout Studio の 数量 列の プロパティ ダイアログのスクリーンショット。Check content type オプションが選択され、Type of column content ドロップダウンリストで Number が選択されています。" width="462" height="377" data-path="images/flexi-capture/fls/tutorial3_26_8.png" />
</Frame>

1. テスト画像に対して FlexiLayout のマッチングを試し、**数量** 列に不要なデータが含まれていないことを確認します。
2. **InvoiceTable** ブロックの位置を記述するには、**Source element** オプションを選択してから、<img src="https://mintcdn.com/abbyy/fmgRWFNHKYN2MLSg/images/flexi-capture/fls/Browse_Button.gif?s=3673db30dda4a3293aec716853588b55" alt="参照ボタン" style={{display:"inline-block",verticalAlign:"middle",margin:0}} width="21" height="20" data-path="images/flexi-capture/fls/Browse_Button.gif" /> をクリックし、ソース要素として **InvoiceTable** 要素を指定します。