> ## Documentation Index
> Fetch the complete documentation index at: https://docs.abbyy.com/llms.txt
> Use this file to discover all available pages before exploring further.
# Azure Active Directory を使用したシングル サインオンの設定
> エンタープライズ アプリケーションから SetIdentityProvider スクリプトまで、ABBYY FlexiCapture と Azure Active Directory 間の SAML ベースのシングル サインオンを設定します。
Azure Active Directory を使用して、ABBYY FlexiCapture の Web Station 向けに SAML ベースのシングル サインオンを設定できます。まず Azure Active Directory でアプリケーションを登録し、次にスクリプトを使用して ABBYY FlexiCapture を設定します。
## Azure Active Directory にアプリケーションを登録する
1. [https://portal.azure.com/](https://portal.azure.com/) にアクセスし、Microsoft Azure アカウントでログインします。
2. **Azure Active Directory > Enterprise applications** セクションに移動します。
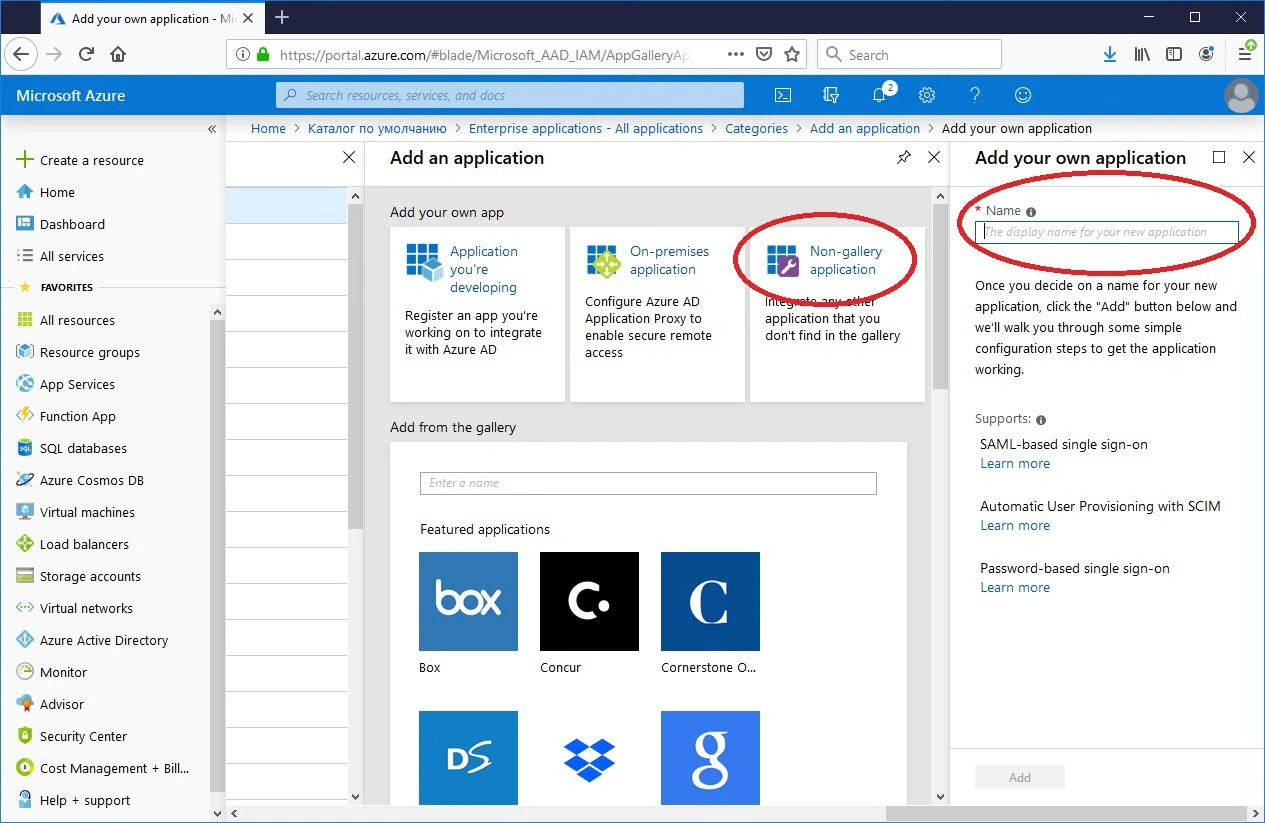
3. **Add an application** ウィンドウで **Non-gallery application** セクションを開き、新しいアプリケーションの名前を指定します。複数のテナントを使用している場合は、テナントごとに個別のアプリケーションを作成します。
 4. **Users and groups** セクションに移動し、必要なユーザーをすべて追加します。これらのユーザーに **User** ロールを割り当てます。
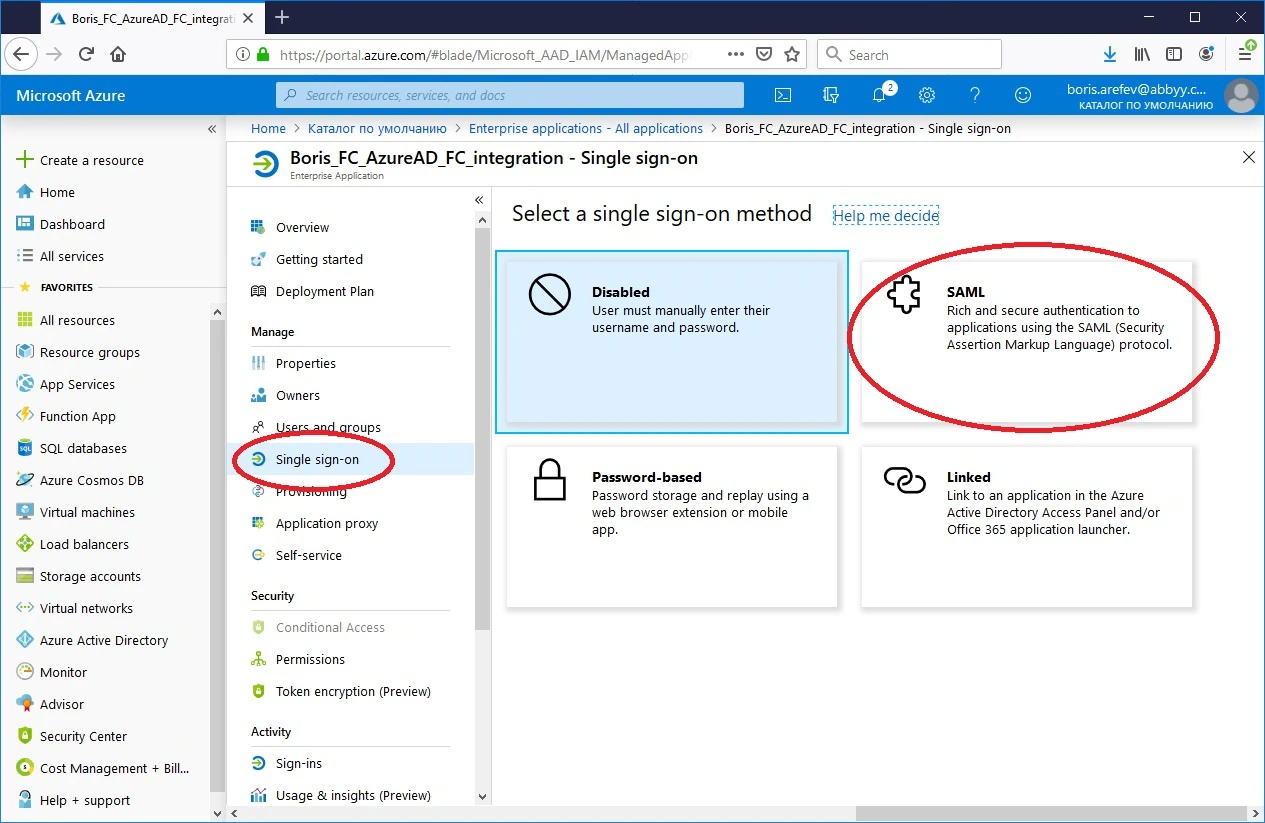
5. **Single sign-on** サブセクションに移動し、**SAML** を選択します。
4. **Users and groups** セクションに移動し、必要なユーザーをすべて追加します。これらのユーザーに **User** ロールを割り当てます。
5. **Single sign-on** サブセクションに移動し、**SAML** を選択します。
 6. **Basic SAML Configuration** セクションを編集します。**Identifier (Entity ID)** フィールドと **Reply URL (Assertion Consumer Service URL)** フィールドに `https:///FlexiCapture12/Login/AccessToken/Saml` を入力し、他のフィールドは空白のままにします。
テナントを設定する場合は、URL を次の形式で指定します: `https:///FlexiCapture12/Login//AccessToken/Saml`
6. **Basic SAML Configuration** セクションを編集します。**Identifier (Entity ID)** フィールドと **Reply URL (Assertion Consumer Service URL)** フィールドに `https:///FlexiCapture12/Login/AccessToken/Saml` を入力し、他のフィールドは空白のままにします。
テナントを設定する場合は、URL を次の形式で指定します: `https:///FlexiCapture12/Login//AccessToken/Saml`
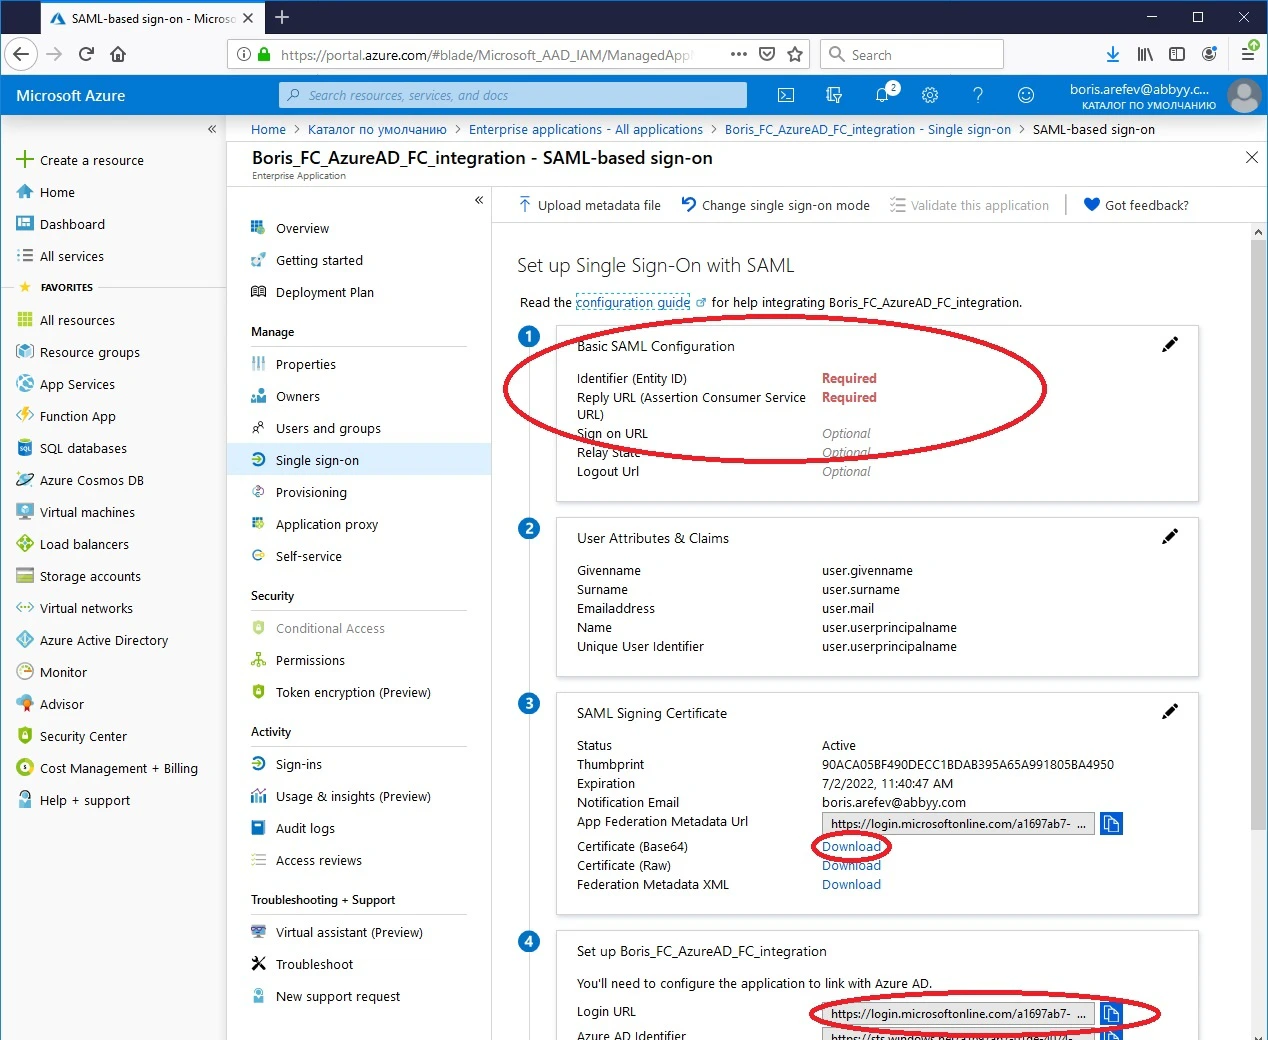 7. **SAML Signing Certificate** セクションで、**Certificate (Base64)** の横にあるリンクをクリックして、Base64 形式の公開証明書をダウンロードします。
8. **Set up \[application name]** セクションの **Login URL** フィールドから、外部 ID プロバイダーのサーバーにアクセスするための URL をコピーします。
7. **SAML Signing Certificate** セクションで、**Certificate (Base64)** の横にあるリンクをクリックして、Base64 形式の公開証明書をダウンロードします。
8. **Set up \[application name]** セクションの **Login URL** フィールドから、外部 ID プロバイダーのサーバーにアクセスするための URL をコピーします。
## ABBYY FlexiCapture を設定する
ABBYY FlexiCapture で必要なパラメーターを設定するには、PowerShell スクリプトを実行します。
1. `SetIdentityProvider.ps1` スクリプトを入手します。
2. ABBYY FlexiCapture がインストールされているマシンで、Windows PowerShell コンソールを管理者として開きます。
3. スクリプトのパスと必要なパラメーターを指定してスクリプトを実行します。例:
```powershell theme={null}
C:\Temp\SetIdentityProvider.ps1 /url 'https://localhost' /certFilePath C:\Temp\AzureAD_FC_integration.cer /pictureFilePath 'C:\Temp\index.svg' /tenant 'TenantName' /providerName 'Azure AD' /Reference 'https://login.microsoftonline.com/123e4567-e89b-12d3-a456-426655440000/saml2'
```
各項目は次のとおりです。
* `/url` — Application Server へのパス。例: `'https://localhost'`。
* `/certFilePath` — 公開証明書へのパス。例: `'C:\Temp\AzureAD_FC_integration.cer'`。
* `/pictureFilePath` — 新しいボタンに使用する画像へのパス (`.svg`、`.jpg`、`.png` 形式に対応しています) 。例: `'C:\Temp\index.svg'`。
* `/tenant` — パラメーターを設定するテナント。例: `'TenantName'`。複数のテナントを使用している場合にのみ指定します。
* `/providerName` — 外部 ID プロバイダー。例: `'Azure AD'`。この場合、ログイン ボタンには **Azure AD でログイン** と表示されます。
* `/Reference` — 外部 ID プロバイダーにアクセスするための URL。例: `'https://login.microsoftonline.com/123e4567-e89b-12d3-a456-426655440000/saml2'`。
これにより、**Azure AD でログイン** ボタンが Web Station のログイン ページに表示されます。
Azure Active Directory が Single Sign-On 用にサポートしている SAML 認証のリクエストとレスポンスの技術的な詳細については、[Microsoft.com のこちらの記事](https://docs.microsoft.com/en-us/azure/active-directory/develop/single-sign-on-saml-protocol)を参照してください。