> ## Documentation Index
> Fetch the complete documentation index at: https://docs.abbyy.com/llms.txt
> Use this file to discover all available pages before exploring further.
# MAPI インポート エラー
> ABBYY FlexiCapture を Microsoft Office 365 と統合する際の MAPI インポート エラーを、コネクタ用の COM+ アプリケーションを作成して設定することで解決します。
ABBYY FlexiCapture を Microsoft Office365 と統合して使用する場合、次のようなエラーが発生することがあります: "Unhandled exception at 0x00007FFAEAB2A839 (KernelBase.dll) in FlexiEx.exe: 0xC06D007E: Module not found (parameters: 0x000000E126EFE040)." この問題は、COM+ アプリケーションを作成して設定することで解決できます。
COM+ アプリケーションを作成する前に:
* ABBYY FlexiCapture のサービスが、Microsoft Outlook プロファイルで使用しているものと同じユーザー アカウントで実行されていることを確認してください。これを行うには、必要なアカウントで Microsoft Outlook を開き、プログラムがドキュメントをインポートするメールボックスを追加します。
* ABBYY FlexiCapture のサービスを実行しているこのユーザー アカウントに管理者権限があることを確認してください。COM+ アプリケーションの作成時にこのユーザー アカウントを使用するためです。
COM+ アプリケーションを作成するには:
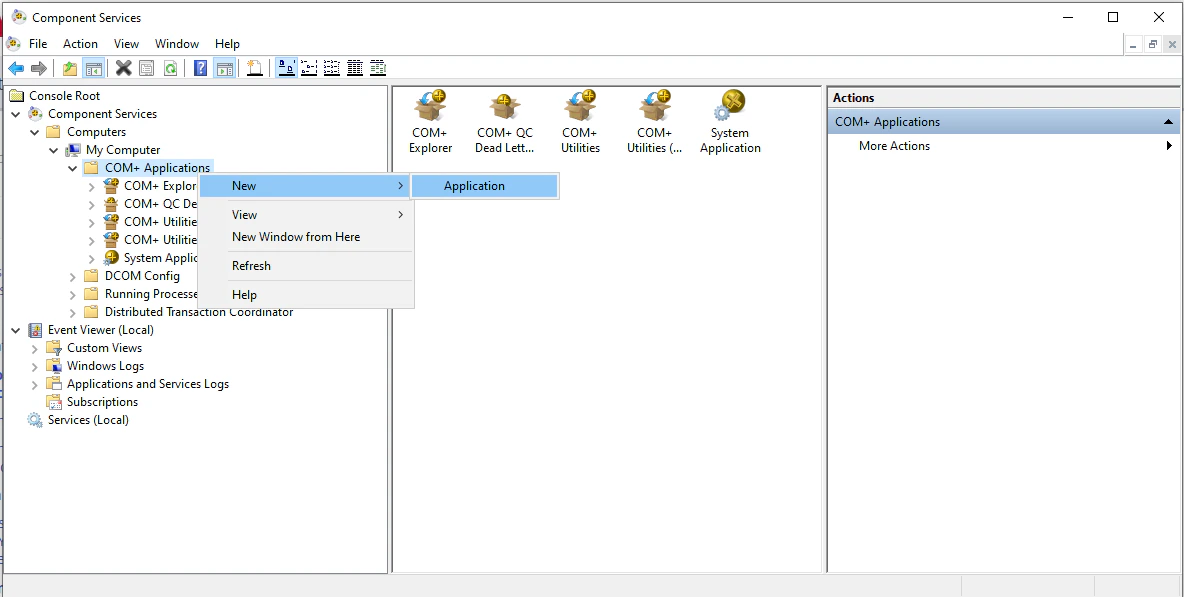
1. **Component Services console** を開き、**Console Root → Computers → My Computer → COM+ Applications** に移動します。
2. **COM+ Applications** を右クリックし、ショートカット メニューの **New → Application** をクリックします。**COM+ Application Install Wizard** が開きます。
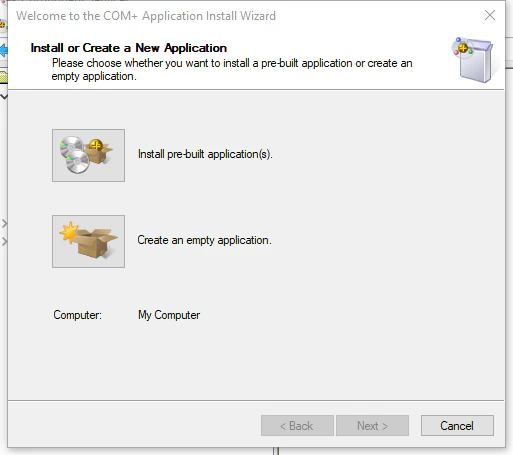
 3. **Install or Create a New Application** ダイアログで、**Create an empty application** をクリックします。
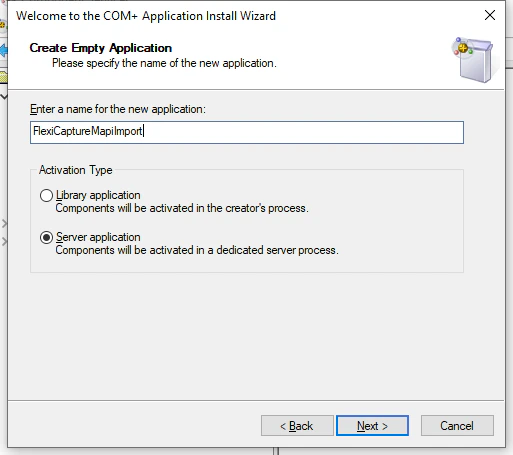
 4. **Create Empty Application** ダイアログで、アプリケーション名を入力し、**Server application** を選択して **Next** をクリックします。
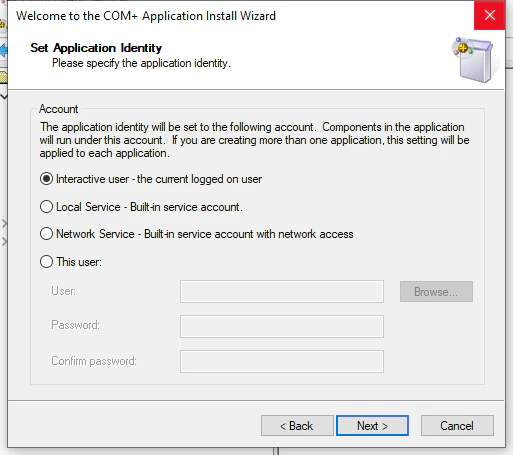
 5. **Set Application Identity** ダイアログで、**Interactive user - the current logged on user** を選択し、**Next** をクリックします。
 6. 残りのダイアログでは、既定の設定のまま **Next** をクリックします。COM+ アプリケーションの作成を完了してください。
COM+ アプリケーションを作成したら、必要な FlexiCapture コンポーネントをインポートする必要があります:
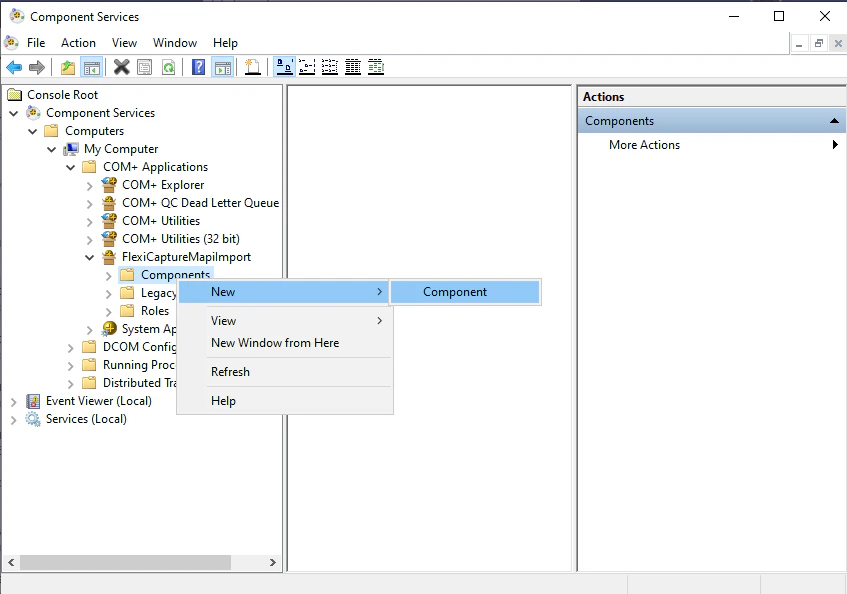
1. 使用可能なアプリケーションの一覧で、新しく作成した COM+ アプリケーションを見つけ、**Components** フォルダーを右クリックして **New → Component** をクリックします。
6. 残りのダイアログでは、既定の設定のまま **Next** をクリックします。COM+ アプリケーションの作成を完了してください。
COM+ アプリケーションを作成したら、必要な FlexiCapture コンポーネントをインポートする必要があります:
1. 使用可能なアプリケーションの一覧で、新しく作成した COM+ アプリケーションを見つけ、**Components** フォルダーを右クリックして **New → Component** をクリックします。
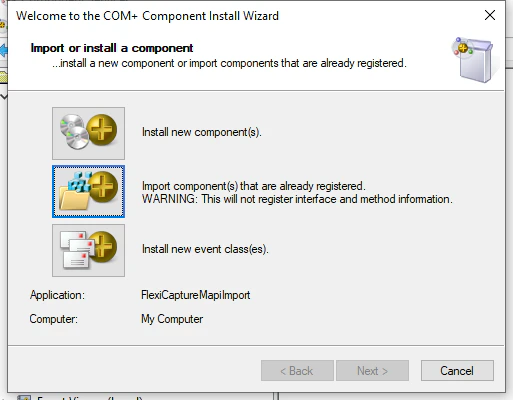
 2. **Import or install a component** ダイアログで、**Import component(s) that are already registered.** をクリックします。
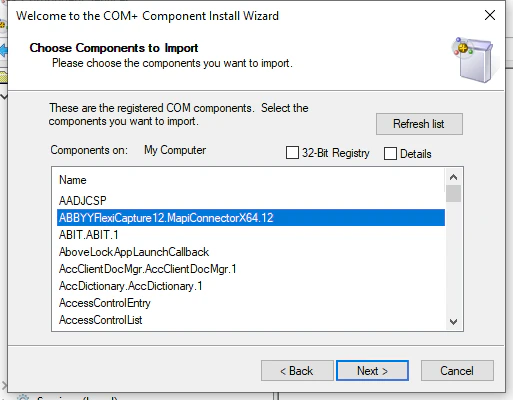
 3. **Choose Components to Import** ダイアログで、次の操作を行います。
* 64 ビット版の Microsoft Office を使用している場合は、ABBYYFlexiCapture12.MapiConnectorX64.12 コンポーネントを選択し、**Next** をクリックします。
* 32 ビット版の Microsoft Office を使用している場合は、**32-Bit Registry** オプションを選択し、ABBYYFlexiCapture12.MapiConnectorX86.12 コンポーネントを選択して、**Next** をクリックします。
3. **Choose Components to Import** ダイアログで、次の操作を行います。
* 64 ビット版の Microsoft Office を使用している場合は、ABBYYFlexiCapture12.MapiConnectorX64.12 コンポーネントを選択し、**Next** をクリックします。
* 32 ビット版の Microsoft Office を使用している場合は、**32-Bit Registry** オプションを選択し、ABBYYFlexiCapture12.MapiConnectorX86.12 コンポーネントを選択して、**Next** をクリックします。
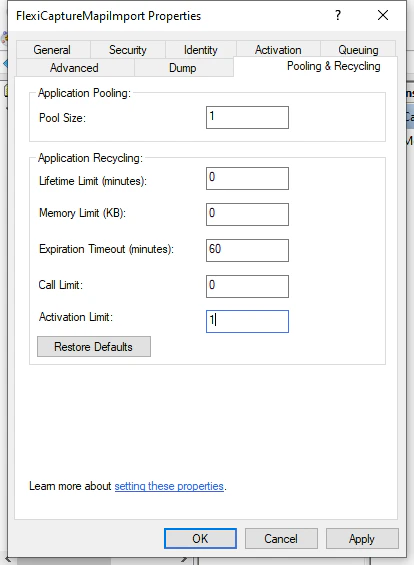
 4. 必要なコンポーネントをインポートしたら、利用可能なアプリケーションの一覧で COM+ アプリケーションを右クリックし、ショートカット メニューの **Properties** をクリックします。表示されるアプリケーションのプロパティ ダイアログで、**Pooling & Recycling** タブをクリックします。
5. **Expiration Timeout (minutes)** ボックスに「60」と入力します。**Activation Limit** ボックスに「1」と入力します。変更を保存するには、**OK** をクリックします。
4. 必要なコンポーネントをインポートしたら、利用可能なアプリケーションの一覧で COM+ アプリケーションを右クリックし、ショートカット メニューの **Properties** をクリックします。表示されるアプリケーションのプロパティ ダイアログで、**Pooling & Recycling** タブをクリックします。
5. **Expiration Timeout (minutes)** ボックスに「60」と入力します。**Activation Limit** ボックスに「1」と入力します。変更を保存するには、**OK** をクリックします。
 新しいインポート設定を反映するには、Processing Station を再起動する必要があります。
MAPI インポートを設定する前に、Processing Station を停止しておくことをお勧めします。Processing Station を停止しないまま MAPI インポートの設定中に「The RPC server is unavailable」エラーが表示された場合は、ABBYY FlexiCapture と Processing Station を再起動してください。
MAPI プロトコルを使用して ABBYY FlexiCapture 12 にインポートする場合は、Microsoft Outlook 2016 の使用をお勧めします。Microsoft Outlook のそれ以降のバージョンはサポートされていません。
新しいインポート設定を反映するには、Processing Station を再起動する必要があります。
MAPI インポートを設定する前に、Processing Station を停止しておくことをお勧めします。Processing Station を停止しないまま MAPI インポートの設定中に「The RPC server is unavailable」エラーが表示された場合は、ABBYY FlexiCapture と Processing Station を再起動してください。
MAPI プロトコルを使用して ABBYY FlexiCapture 12 にインポートする場合は、Microsoft Outlook 2016 の使用をお勧めします。Microsoft Outlook のそれ以降のバージョンはサポートされていません。