> ## Documentation Index
> Fetch the complete documentation index at: https://docs.abbyy.com/llms.txt
> Use this file to discover all available pages before exploring further.
# ABBYY Vantage Connector for Microsoft Power Automate
> Install and configure the ABBYY Vantage custom connector for Microsoft Power Automate, including OAuth 2.0 security setup and connection testing.
The ABBYY Vantage connector for Microsoft Power Automate allows developers to add data extraction and document classification functionality to automation flows. This is a redistributable package for manual installation.
## Prerequisites
A premium Power Automate license is required to use this connector.
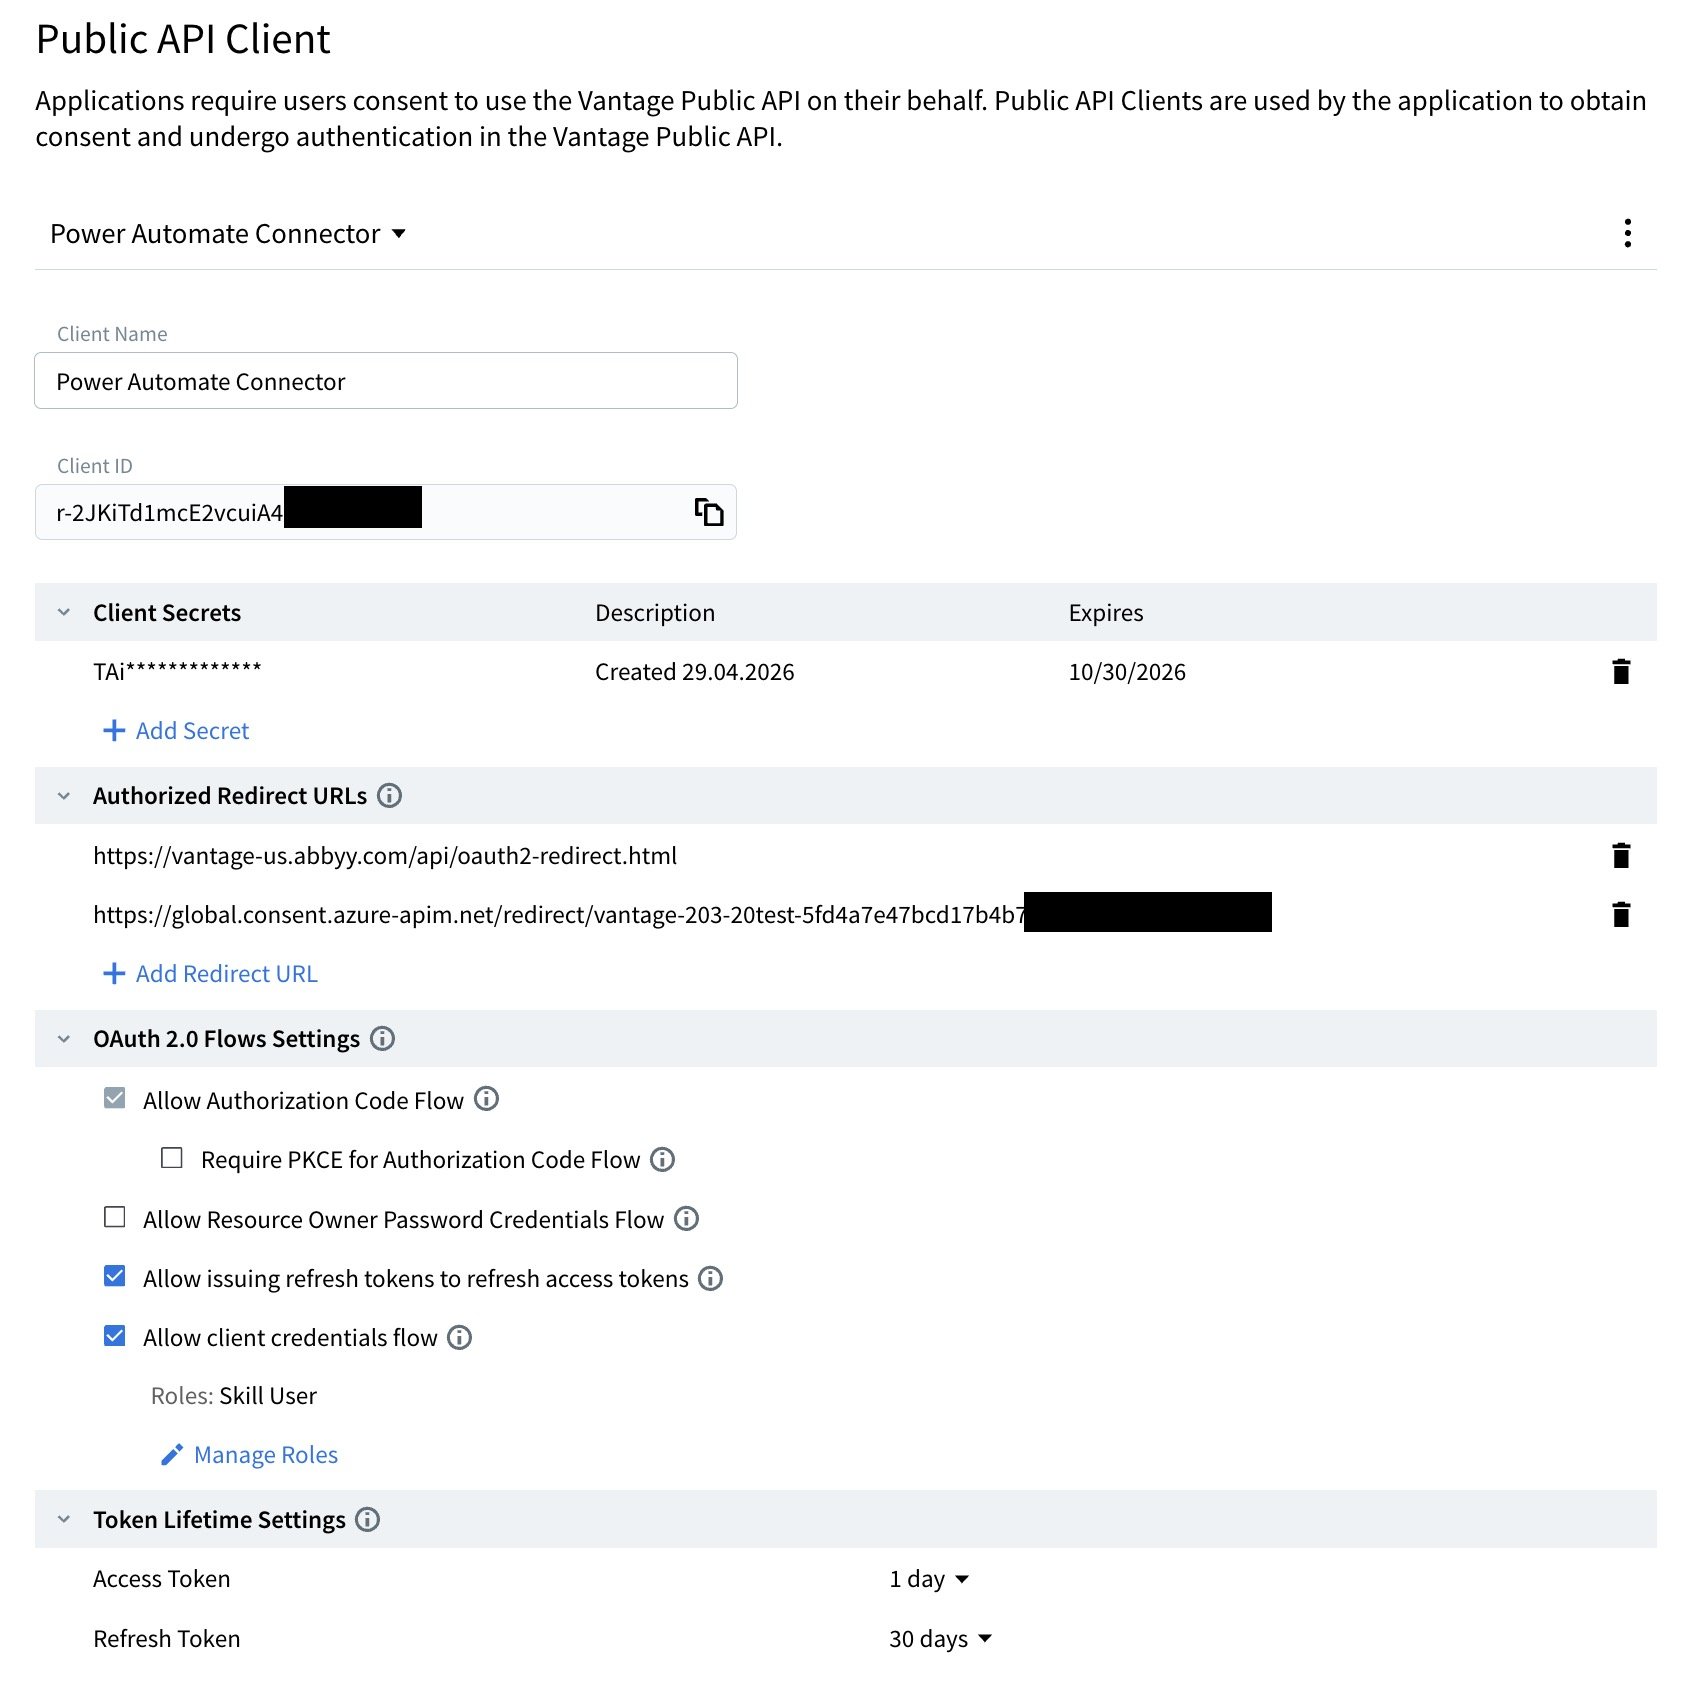
You will need a Vantage tenant with a [Public API Client](/vantage/documentation/tenant-admin/tenant-management/configure-client) configured.
Configure these settings for this connector:
* **Authorized Redirect URL**: Obtained from Power Automate further in this setup guide. Keep the abbyy.com redirect URL.
* **Client ID**: Your Public API Client ID.
* **Client Secret**: Your Client Secret.
* Disable **Require PKCE for Authorization Code Flow**.
* Enable **Allow issuing refresh tokens to refresh access tokens**.
* Enable **Allow client credentials flow**. For Role(s), select `Skill User`.
 ### Find the Tenant ID
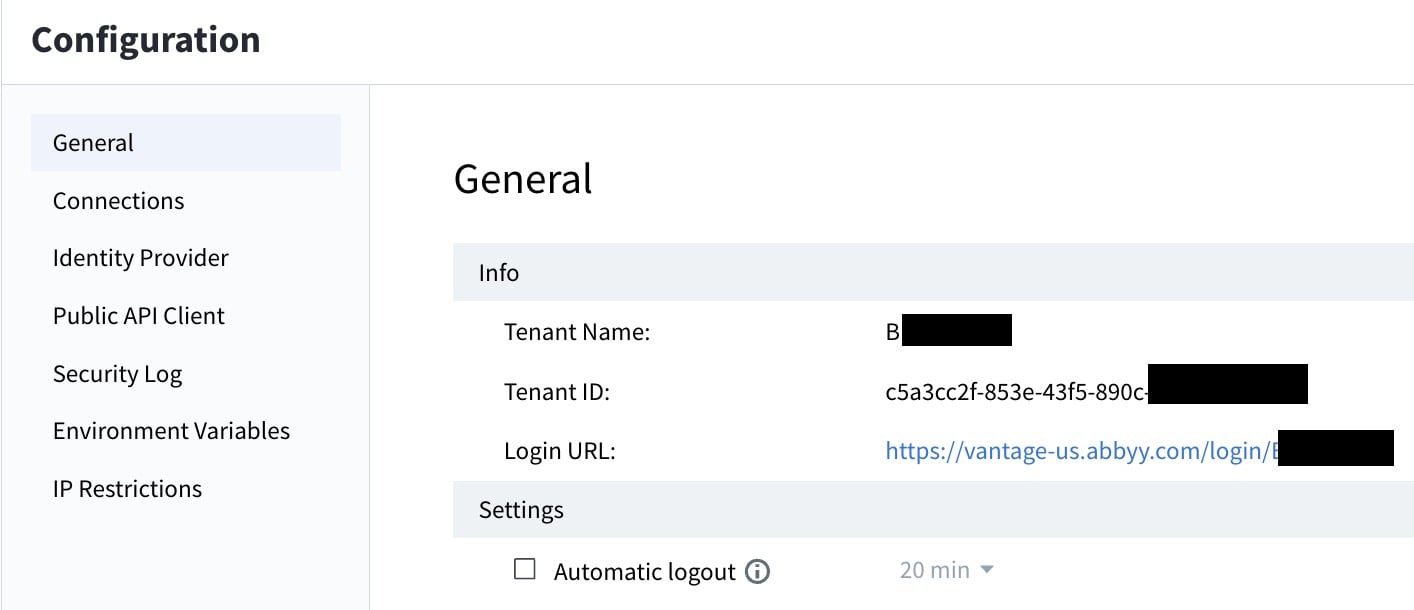
You will need the Vantage Tenant ID during the security configuration step.
In Vantage, click **Configuration** in the left pane.
Click **General** and find the **Tenant ID** field.
### Find the Tenant ID
You will need the Vantage Tenant ID during the security configuration step.
In Vantage, click **Configuration** in the left pane.
Click **General** and find the **Tenant ID** field.
 ## Install the connector
First, [download the connector](https://www.abbyy.com/marketplace/assets/host/abbyy/connector/microsoft-power-automate/) from the ABBYY Marketplace.
In Microsoft Power Automate, select **Data > Custom connectors** from the menu on the left. You may need to select **More** to find the option.
Click **+ New custom connector** and select **Import an OpenAPI file**.
Enter a name for the connector, such as `ABBYY Vantage`.
Browse for the `ABBYY-Vantage-ProcessingAPI.swagger.json` file and open it.
### Configure general information
Upload a connector icon using the ABBYY Vantage logo (`Vantage-Square-icon.png`) included in the connector download.
Change the **Host** URL to your Vantage server address. Use the same host address in the **Authorization URL** and **Token URL** fields.
```text US theme={null}
vantage-us.abbyy.com
```
```text EU theme={null}
vantage-eu.abbyy.com
```
```text AU theme={null}
vantage-au.abbyy.com
```
### Configure security
Set **Authentication type** to **OAuth 2.0** and fill in the following fields using the values from your Vantage Public API Client. Select your tenant region in the URL fields below and replace `[tenant-id]` with your tenant identifier:
* **Client ID**: Your Public API Client ID.
* **Client secret**: Your Public API Client secret.
* **Authorization URL**:
```text US theme={null}
https://vantage-us.abbyy.com/auth2/[tenant-id]/connect/authorize
```
```text EU theme={null}
https://vantage-eu.abbyy.com/auth2/[tenant-id]/connect/authorize
```
```text AU theme={null}
https://vantage-au.abbyy.com/auth2/[tenant-id]/connect/authorize
```
* **Token URL**:
```text US theme={null}
https://vantage-us.abbyy.com/auth2/[tenant-id]/connect/token
```
```text EU theme={null}
https://vantage-eu.abbyy.com/auth2/[tenant-id]/connect/token
```
```text AU theme={null}
https://vantage-au.abbyy.com/auth2/[tenant-id]/connect/token
```
* **Refresh URL**:
```text US theme={null}
https://vantage-us.abbyy.com/auth2/[tenant-id]/connect/token
```
```text EU theme={null}
https://vantage-eu.abbyy.com/auth2/[tenant-id]/connect/token
```
```text AU theme={null}
https://vantage-au.abbyy.com/auth2/[tenant-id]/connect/token
```
* **Scope**: `openid permissions global.wildcard offline_access`
Finalize the security configuration with the following steps.
Click **Create Connector** at the top of the page to create the connector and generate the Redirect URL.
Copy the Redirect URL. In your Vantage Public API Client under **Authorized Redirect URLs**, click **Add Redirect URL** and paste the URL.
In your Vantage Public API Client under **OAuth 2.0 Flows Settings**:
* Disable **Require PKCE for Authorization Code Flow**.
* Enable **Allow issuing refresh tokens to refresh access tokens**.
## Create a connection
On the **Test** tab, choose **New Connection**. A pop-up login window opens. Enter your ABBYY Vantage username and password. Be sure to choose the same account that contains the Public API Client for Microsoft Power Automate.
## Test the connection
After successfully logging into your Vantage account, the new connection appears in the Connections list. Verify that the connector is functioning properly by testing an operation. Select `ListAllAvailableSkills` from the Operations list and click **Test operation**. If it doesn't work, review the previous steps to ensure all fields have been configured correctly.
## Import demo flows
For more information, see [Sample process for the Power Automate connector](/vantage/connectors/ms-powerautomate/sample-process).
## Modify flows
You can modify a demo flow or create your own. If you need to work with a specific data set from a JSON-based response, you can modify the JSON schema. To get the JSON schema, open the Swagger UI and call the required method. The Swagger UI is available at:
```text US theme={null}
https://vantage-us.abbyy.com/api/index.html?urls.primaryName=publicapi%2Fv1
```
```text EU theme={null}
https://vantage-eu.abbyy.com/api/index.html?urls.primaryName=publicapi%2Fv1
```
```text AU theme={null}
https://vantage-au.abbyy.com/api/index.html?urls.primaryName=publicapi%2Fv1
```
## Next steps
View the [release notes](/vantage/connectors/ms-powerautomate/release-notes) for the Microsoft Power Automate connector.
## Install the connector
First, [download the connector](https://www.abbyy.com/marketplace/assets/host/abbyy/connector/microsoft-power-automate/) from the ABBYY Marketplace.
In Microsoft Power Automate, select **Data > Custom connectors** from the menu on the left. You may need to select **More** to find the option.
Click **+ New custom connector** and select **Import an OpenAPI file**.
Enter a name for the connector, such as `ABBYY Vantage`.
Browse for the `ABBYY-Vantage-ProcessingAPI.swagger.json` file and open it.
### Configure general information
Upload a connector icon using the ABBYY Vantage logo (`Vantage-Square-icon.png`) included in the connector download.
Change the **Host** URL to your Vantage server address. Use the same host address in the **Authorization URL** and **Token URL** fields.
```text US theme={null}
vantage-us.abbyy.com
```
```text EU theme={null}
vantage-eu.abbyy.com
```
```text AU theme={null}
vantage-au.abbyy.com
```
### Configure security
Set **Authentication type** to **OAuth 2.0** and fill in the following fields using the values from your Vantage Public API Client. Select your tenant region in the URL fields below and replace `[tenant-id]` with your tenant identifier:
* **Client ID**: Your Public API Client ID.
* **Client secret**: Your Public API Client secret.
* **Authorization URL**:
```text US theme={null}
https://vantage-us.abbyy.com/auth2/[tenant-id]/connect/authorize
```
```text EU theme={null}
https://vantage-eu.abbyy.com/auth2/[tenant-id]/connect/authorize
```
```text AU theme={null}
https://vantage-au.abbyy.com/auth2/[tenant-id]/connect/authorize
```
* **Token URL**:
```text US theme={null}
https://vantage-us.abbyy.com/auth2/[tenant-id]/connect/token
```
```text EU theme={null}
https://vantage-eu.abbyy.com/auth2/[tenant-id]/connect/token
```
```text AU theme={null}
https://vantage-au.abbyy.com/auth2/[tenant-id]/connect/token
```
* **Refresh URL**:
```text US theme={null}
https://vantage-us.abbyy.com/auth2/[tenant-id]/connect/token
```
```text EU theme={null}
https://vantage-eu.abbyy.com/auth2/[tenant-id]/connect/token
```
```text AU theme={null}
https://vantage-au.abbyy.com/auth2/[tenant-id]/connect/token
```
* **Scope**: `openid permissions global.wildcard offline_access`
Finalize the security configuration with the following steps.
Click **Create Connector** at the top of the page to create the connector and generate the Redirect URL.
Copy the Redirect URL. In your Vantage Public API Client under **Authorized Redirect URLs**, click **Add Redirect URL** and paste the URL.
In your Vantage Public API Client under **OAuth 2.0 Flows Settings**:
* Disable **Require PKCE for Authorization Code Flow**.
* Enable **Allow issuing refresh tokens to refresh access tokens**.
## Create a connection
On the **Test** tab, choose **New Connection**. A pop-up login window opens. Enter your ABBYY Vantage username and password. Be sure to choose the same account that contains the Public API Client for Microsoft Power Automate.
## Test the connection
After successfully logging into your Vantage account, the new connection appears in the Connections list. Verify that the connector is functioning properly by testing an operation. Select `ListAllAvailableSkills` from the Operations list and click **Test operation**. If it doesn't work, review the previous steps to ensure all fields have been configured correctly.
## Import demo flows
For more information, see [Sample process for the Power Automate connector](/vantage/connectors/ms-powerautomate/sample-process).
## Modify flows
You can modify a demo flow or create your own. If you need to work with a specific data set from a JSON-based response, you can modify the JSON schema. To get the JSON schema, open the Swagger UI and call the required method. The Swagger UI is available at:
```text US theme={null}
https://vantage-us.abbyy.com/api/index.html?urls.primaryName=publicapi%2Fv1
```
```text EU theme={null}
https://vantage-eu.abbyy.com/api/index.html?urls.primaryName=publicapi%2Fv1
```
```text AU theme={null}
https://vantage-au.abbyy.com/api/index.html?urls.primaryName=publicapi%2Fv1
```
## Next steps
View the [release notes](/vantage/connectors/ms-powerautomate/release-notes) for the Microsoft Power Automate connector.